Click on the Distributor option in the left hand menu or under the General section of the home page to go to the Distributor Search interface. Then search for the member in your system by providing the Username, Name or any other relative criteria, and then by clicking on the Search button below.
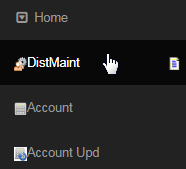
You will be redirected to the Distributor Maintenance area of the member (also termed as DistMaint). This is the home page for admin back-office for that particular member (whom you have searched for). If you want to return to the Distributor Maintenance, then click on DistMaint on in the left hand menu.
- Note: Clicking on the Home menu (left hand side) would take you to the Admin home page, which is same as Admin > Home menu at the bottom.
This section displays the recognition details of the member , i.e. how the member is identified by the system. If the Referer and/or the Language types are edited then remember to click on the Submit Identification Details button to save and apply the changes. Here's the description of the attributes;
- Customer Number (ID): The system generated identification number of the member. It can used as a reference number in the system.
- Legacy ID: This is a number that is used to reference a member from a different system when database transferred or copied if relevant.
- Best Title: The best title the member has ever held. | Current Title: The members current title they are qualifying for this period.
- Qty Customers | Qty Sponsored: The total number of Customers and Distributors sponsored (respectively) by the member till date.
- Last Login: The date and time on which the member logged by latest. | Last IP: The Last IP address the member logged in from.
- Webpage Hits: The total number of hits (page views) to the members personal website.
- Last Date of Webpage Hit: The date and time on which the Webpage Hit was counted by latest.
- Referer: The current referrer type of the member. | Language: The language to which the member account is set to.
- Message Archive: The count of received and handled message by the member. Clicking on the link would open the Messages page

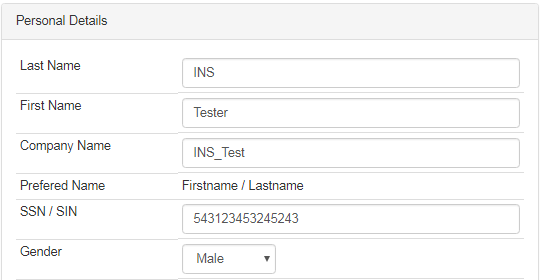
This section contains the personal information about the member as described below. As an admin you can edit the details as and when required. If you have changed the value of any field, remember to click on the Submit Personal Details button at the bottom of this section to commit to the changes.
- Last Name The surname or the family name of the member. | First Name: The initial or the first name of the member.
- Company: The name of the company the member belongs to. Also, in case the user is represented as an organization.
- Preferred Name: The format in which the name of the member would be displayed in the system, such as the reports.
- SSN / SIN: The social security number of the member. | Gender: Weather the member is a male, female or an organization.
- Captcha on Login: Enable or disable the requirement of entering the 4-digit numeric code (auto-generated in random manner) while signing into the system for this member. We suggest not to disable this feature to avoid access to spam and automated extraction of data from websites.
- Date Joined: The date on which the member had signed up into the system. | Password: The password the member has set for login access.
- Security Question: The question selected here would be asked to the member when he clicks on the Forgotten your password? link on login.
- Security Question Answer: The answer to the security question. | Web Password: not used/not applicable
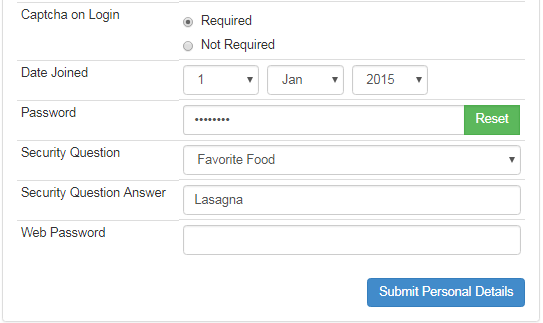
- Changing the preference for Captcha on Login is applied only to the current member. This does not affect any other member's settings.
- Clicking on the Reset button next to the Password field, sends a password retrieval email to the member's registered email address.
- Do not get confused by the way of resetting password and sending password reset email to member. Click here to learn more about this.
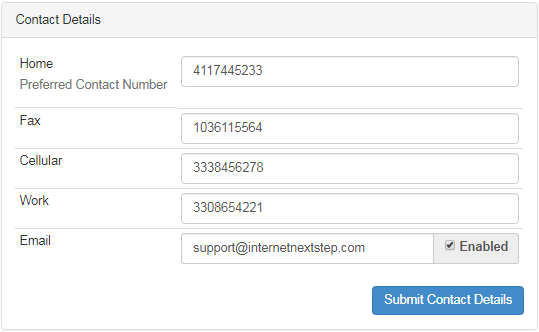
This section contains the contact information about the member as described below. As an admin you can edit the details as and when required. If you have changed the value of any field, remember to click on the Submit Personal Details button at the bottom of this section to commit to the changes.
- Home: Displays the contact of the member's residence. | Fax: The member's facsimile number (if any).
- Cellular: The member's personal cell phone number. | Work: The contact number of the member's office.
- Note: Please include Area Code on all phone numbers to make them work flawlessly.
- Preferred Contact Number: This will be labelled for that option which is selected as primary contact number by the member on signup. It states that the said phone number would be used as the preferred one for communicating the member. Can choose between home, work and mobile.
- Email:The primary email ID of the member registered while signup. You can temporarily enable or disable the email ID by ticking on the checkbox next this field. The email address is generally enabled by default (if the email ID is activated). If disabled the member wont receive any email.
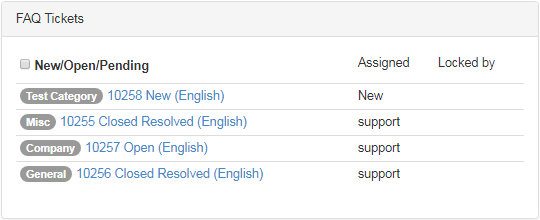
This section gives you a summary of the support tickets raised by the member in concern. It displays the list of the tickets based on the dates they were updated by latest, along with the ticket status, category, language it is in, username of the user to whom they are Assigned to and currently Locked by.
- Clicking on the TicketID link would open the Frequently Asked Questions - Editing page where you can update the same. Click here to learn more.
- Ticking on the New/Open/Pending check box should hide all the tickets with the status Closed Resolved, displaying only the mentioned ones.
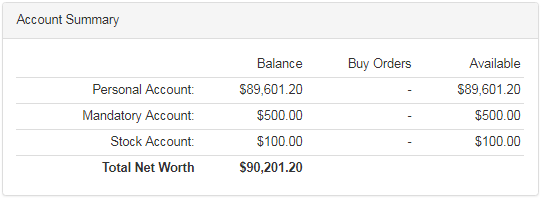
This section simply gives you a summary of balance in the accounts of the member. The data is extracted from the member's DistMaint > Account page.
- Balance: The current balance in the account of the member. | Buy Orders: The amount worth the current order placed by the member.
- Available: The amount of fund after successful deduction of the order amount. | Total Net Worth: The sum of all the account balances.
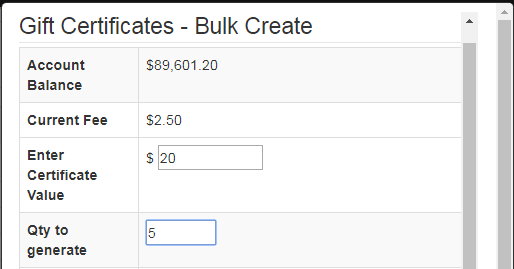
This section displays all other assorted features that are active for the members in the system, which also can be manipulated by the admin users. For example, creation of bulk gift certificate on behalf of the member. Select the currency type to be used to create the certificates by clicking on the same.
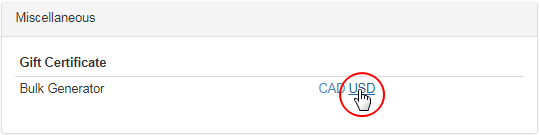
A floating window would pop-up where you need to enter/edit the details of the certificate as described below and then click on the Create Bulk Gift Certificates at the bottom of that window. On success, a Bulk Gift Certificates Created message will be displayed at the bottom of that window.
- Account Balance: The balance in the member's Personal Account. | Current Fee: The amount charged for issuing each certificate.
- Enter Certificate Value: How mush does each of the certificate will worth. | Qty to generate: How many certificates you want to generate.
- Enter Message on Gift Certificate: Type in a common custom message for the receivers that would be included into the gift certificate email.
- Please select the Gift Givers name to appear on the Certificiate: Can be changed to any preferred name. The members username by default.

The members can get the information (or cancel them) in Gift Certificates > Summary page. For admin, go to System > Gift Certificate > Summary page. Click here to learn more about creating bulk certificates. Alternatively, the same can be achieved in Home page > 3rd quadrant > Gift Certs tab.
This section list all the current address recorded on file by the member. The Type of address resembles the use of the address for that purpose. The Default type is the member's mailing address. If no Shipping address is found present then the system will use the Default address.for shipping purpose.
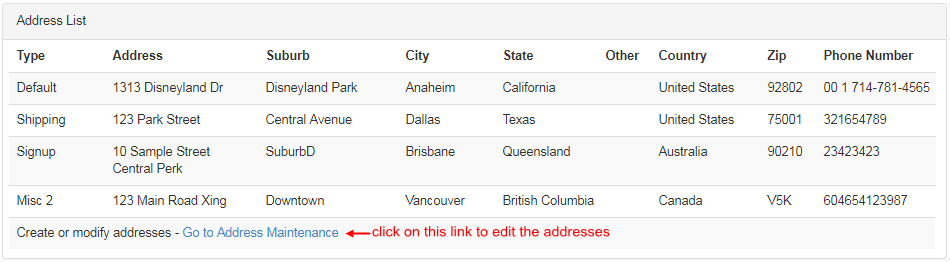
As an admin you can modify the addresses on behalf of the member. To do that, click on the Go to Address Maintenance link below. This would take you to the Address Maintenance page where you can swap, edit, or create new address. Read the instructions on that page (bottom) before proceeding.
This sections puts up the summarized record of the members credit cards stored in the database. You can edit the details of a card on behalf of the member by clicking on the corresponding Edit button at the end of the row. This would redirect you to the DistMaint > Payment Types page.
- Card Name: The name of the user as appear on the Credit Card. | Card Number: The first and last 4-digits of the Credit Card number.
- Expiry Date: The month and year on which the credit card is due to expire. | Default Card?: If this card is set to *Default* (as displayed).

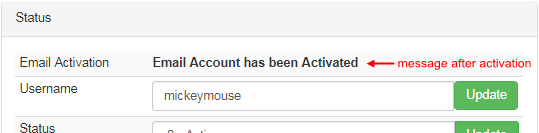
- Email Activation: This states whether the email address of the member as recorded on file has been activated to be used in the system or not. As an admin you can manually activate the member's email address by clicking on the Active Email button next to this field. Here's an example.
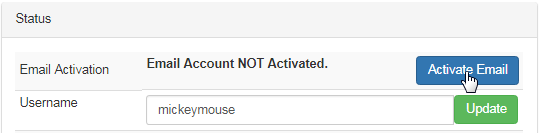
- Username: This the username of the member as identified by the system. It is possible to edit the username of a member, but we suggest to consult with INS before you take action. To change the username, edit the text in the box and then click on the Update button next to that box.
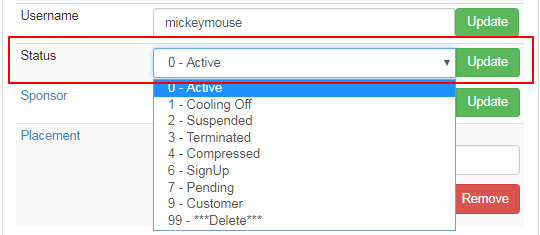
- Status: This states the current status of the member. You can change the status (depending upon your requirement). To do that, open the drop-list, select the one (described below) and then click on the Update button next to that. Make sure you understand the risk of changing the status.
- 0 - Active: The members with Active status have access to all the functionalities of their Members Lounge and account related features.
- 1 - Cooling Off: If the member has not used the system or purchased any products for a long period of time, then the system automatically changes the member's status to Cooling Off after the number of days as specified in the system (if any). You can change it here manually.
- Note: Next time the member logs into system and purchase a product, the status will change from Cooling Off to Active. You can change the setting in Configuration > Admin > System Defaults > Cooling Off Period (in days). To disable this feature, set its value to 0 (zero).
- 2 - Suspended: If the status of a member is set as Suspended, then the system will prevent that member from signing into his Member Lounge. Though the member will not be removed from being placed and they will loose nothing; he will not have login access to the system.
- 3 - Terminated: This means that the member will be Terminated in every aspect and he will be compressed and forced out from the system. In this case, the member will loose all his downlines and the autoship order, etc will be cancelled. Be careful, the process is irreversible.
- 4 - Compressed: This means that the member will be compressed out of the placement tree and one of his downline will inherit his position based on the specified Compression Type. You can set up automatic compression, where the members who are inactive for a specified number of days are automatically compressed out of the placement tree. Check out the Setting Up Compression manual to learn more.
- 6 - SignUp: This status means that the member is still in the signup process, i.e. either process is left incomplete, aborted, or timed -out.
- 7 - Pending: This status means that the member has completed the signup process but is yet to confirm the payment of the signup order.
- 9 - Customer: The member has signed up as Customer and are marked as active. He is restricted to the customer privileges in their Members Lounge, i.e. he has access to make retail orders, view invoices, update his personal/payment details, etc or as set in the system.
- 99 - ***Delete***: This is an internal setting for INS and is designed to remove a distributor immediately from the system that was signed up incorrectly. It is not designed to remove someone once they have sponsored, purchased or earned commission. Instead use Terminate.
- Note: It is not to be used to remove old distributors that have quit or gone away. If you use this function, you must ensure that the distributor you are trying to delete has not sponsored anyone before proceeding with removing him from the system. Click here to learn more.
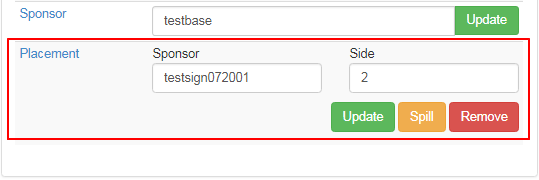
- Sponsor: This is the person who sponsored the member you are looking at. To change the sponsor to a different user, edit the sponsor's username in the text-box provided and then click on the Update button next to that. Note that the new sponsor username must exist in the system.
- Placement: The Sponsor text-box states the username of the member under whom the current user has been placed. The Side text-box states that on which side/leg the member is placed under that sponsor. You can edit the placement as follows. Click on the Update button below to save.
- The place you are moving the member to must be vacant. For e.g. if you want to move Frank under Joe in his Leg 3 and someone is already placed in that place, then the current move will fail. Once again make sure that the destination position is empty before you take action.
- If there is a user in the place where you want to move the current member, you must do a double move - move the person who is in the place you want the move, to a temporary location and then move your target to that spot. Then move the user back from temporary location.
- Remember to move a person and EVERYONE below them. if you want to move someone but not his downline, then its a 2-3 step operation.
- Spill: This button works similar to that of Placement. However, if the spot you are trying to move is not vacant, then instead of the move to fail, the system will continue down the line until it finds the next vacant place in that leg you have chosen, depending on the placement settings.
- For example, if you would like to place Frank under Joe in his Leg 1 and if it is taken, the Frank will be placed in the next vacant left leg spot.
- The Sponsor and the Placement links in this section will redirect to the Distributor Maintenance area of the respective users, on clicking them.
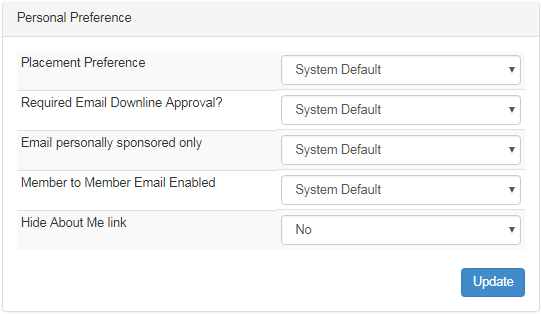
As an admin you can change the following preference of the member and then click on the Update button below to commit to the changes.
- Placement Preference: In which side or leg of the member will the new signups be placed under him. Select from the drop-list.
- Required Email Downline Approval?: Whether the emails sent by this member to his downlines require admin approval or not.
- Email personally sponsored only: Whether or not to restrict the member to send emails only to his personally sponsored members.
- Member to Member Email Enabled: Whether or not to allow the member to send and receive emails from other members in the system.
- Hide About Me link: Enable or disable the display of About Me link on the member personal website. By default it is set to No.
This is where your Customer Service Representatives will record any notes about any interaction with the member. Any phone call should be recorded here in order to keep your support requirements streamlined. Enter a Heading and the Comment and then click on the Add button to post the same.
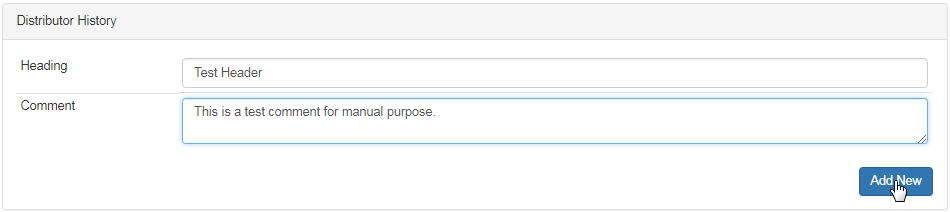
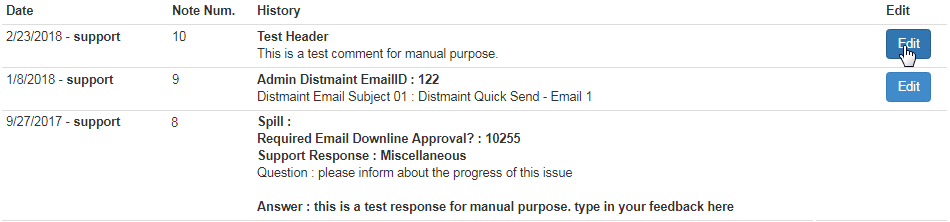
The posted comments/notes are listed below the Distributor History box (latest to oldest). Along with the custom added comments, the support tickets (summarized) that are raised by the member are also listed in this table in question-answer format. You can edit the ones that are added by admin users.
- Date: The date on which the note was posted and the username of the person who posted the same.
- Note Num: The sequence number of the note (decreasing manner). | History: The content of the post.
- Edit: Click on this button to edit and update the post. Only the content under History can be edited.
The Edit button will only appear for the comments added by users or the post from system events. To edit the content of the support tickets check the FAQ Admin manual. After you have completed editing the content, click on the Save button to commit to the changes. To abort the change, hit Edit.

Once you have saved the changes, notice the Date column - another date has been added here - the date on which the post was updated by latest. So the first date is the posting date and the second is the date of last update. Also, it stores the username of the user who edited the post by latest.

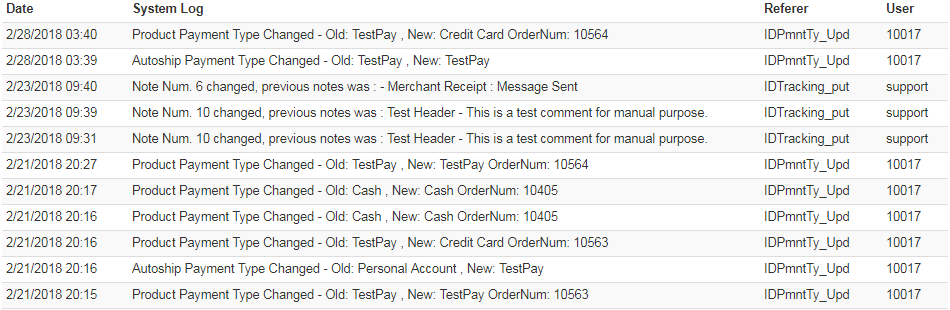
This is where anything the system does automatically or admin or the member changed will get a note stamped to show what was going on. Very helpful area with regards to issue resolution. To view (load more) the complete log click on the Show Full System Log button at the bottom of the page.
- Date: The date and time on which the event occurred in the system. | System Log: The brief explanation of the system event occurred.
- Referer: The system function that triggered the event. | User: The Customer Number or the username of the user who's responsible for the event.