You can add line details which specify different Product attributes, such as weight (for shipping), size, etc. To start with, click on the add new button below the section. An empty row will be added below the list where you can define a new attribute. Then click on the save product details button to commit to the changes.
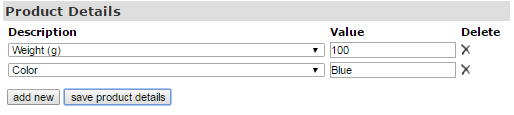
- Description: Click here to open the drop-down menu of the attributes to choose from.
- Value: Enter the appropriate value to define the attribute of the item you have chosen.
- Delete: Click on the X icon to remove the corresponding pricing, followed by confirming your action.
Find below the description of all the attributes of the Product Details. If you need an attribute that is not displayed in the drop-down menu, then let us know; We can add it to the available options for you. In case of any query, please contact INS Support or report a bug in mantis (assign it to support).
- Weight (oz): To specify the weight of the item measured in ounces. You can use this to tie into your shipping formula.
- Weight (g): To specify the weight of the item measured in grams. You can use this to tie into your shipping formula.
- Length (cm): To specify the length of the item measured in centimeters. Also can be used in custom shipping calculations.
- Height (cm): To specify the height of the item measured in centimeters. Also can be used in custom shipping calculations.
- Width (cm): To specify the width of the item measured in centimeters. Also can be used in custom shipping calculations.
- Cubic (m3): To specify the total volume vs. entering L,H,W dimensions. Also can be used in custom shipping calculations.
- Most useful if your products are more likely to be shipped by volume than weight.
- Size: It is used to specify the size of the item for the product. For example, more that one size of the same product.
- Color: It is used to specify the color of the item for the product. For example, more that one color of the same product.
- Content Type: Should you need customs numbers for international shipping, you could enter the product classification number here.
- Your Invoice/Picking slip could then be customized to show this in an appropriate manner for the country you are shipping to.
- Lot #: if you are selling nutritional products, you can put your lot number in here and the system will track it for orders and invoices.
- The value changes as you change it here, and is not tied to inventory function.
- Package Type: Specify the Package Type for display purpose (if any).
- Package Quantity: Specify the quantity of the package content (if any).
- Title Type: You can set this to different numbers which correspond to rank, which can be found in the Flag Update section.
- These numbers relate to the Ranks/Levels in your company. If someone buys this product and you set this to an existing Rank/Title Type according to your commission plan, then when they buy the product they will be upgraded to the appropriate rank/title. Say you have a Bronze/Silver/Gold package that triggers different coded bonuses etc., you can use this to tie into the commission plan for such purposes.
- It can create regulatory issues to have a commission plan that just buying more allows for higher pay.
- Consult with your legal team before proceeding with this method to be sure you understand the risks associated.
- Required TitleTy: Is also connected to the values in the Flag Type or Flag Update section. When you place a number in the box next to this option you are stating that the only people who can buy this (or even see it in the Shopping Cart) are those who are of that level or higher.
- This option allows you to have items that are available for purchase ONLY for members at certain rank.
- Volume Months: Set how many months you want the volume of this item to be spread over.
- Use this function. if you want to have a prepaid autoship component where the product purchased in advance, shipped as ordered, but points put into the comp plan over the prepaid period rather than a big chunk of points into the comp plan all at once.
- Excellent way to ensure long term retention even while increasing your immediate cash flow.
- Faststart: If your comm plan has a fast start bonus, enter value 1; this item will be considered to count towards earning your fast start bonus.
- Tariff Code: This option can be used for appropriate customs paperwork should you need.
- Expiry (months): This is for our OMSYS system where we set how long the product stays enabled based on a particular product package being purchased. So, if someone prepays for 3 months, this quantity would be 3. This function could be hooked in to save customization time for clients who have software subscription based products they are have within our system.
- Expiry Date (dd mon yyyy): Set the Date of product expiry for the product/item here. Enter the value as 'dd/mm/yyyy' date format.
- Escrow Num Days: Only used for clients who have purchased optional Stock Market Game Module.
- This option is NOT recommended for North American clients.
- Personal Dollars: Accrues Personal Dollars by the amount specified when someone purchases this item. Same concept as Incentive Dollars.
- Put the specified dollar amount in default currency into Personal Account when the product is paid.
- Mandatory Account Dollars: Put the specified credits into Mandatory Account. This can work with Escrow Num Days.
- Only used for clients who have purchased optional Stock Market Game Module. NOT recommended for North American clients.
- Stock Account Dollars: Put the specified credits into Stock Account.
- Credit Share Account: Put the specified credits into Share Account.
- Game Account Credits: Put the specified credits into Gaming Account.
- Auction Account Credits: Put the specified credits into Auction Account.
- Incentive Dollars: Putting a value into this option works in conjunction with the rewards currency.
- To use this please ensure you have enabled the Rewards Currency in Configuration > Shopping Cart > Cart Prefs.
- Once enabled, any value you put in for Incentive Dollars here will be deposited into the members personal account in Reward Currency for use in purchasing your reward items. It allows you to run an incentive rewards program to reward loyalty.
- Recharge Credits: Accrues Recharge Credits by the amount specified. Put the specified amount of Credit Type into Personal Account.
- Upload Credits: Accrues Upload Credits by the amount specified. Put the specified amount of Credit Type into Personal Account.
- Download Credits: Accrues Download Credits by the amount specified. Put the specified amount of Credit Type into Personal Account.
- Also used by clients who have purchased our available Auction module. This is often used by VOIP or Music download type MLM clients.
- Voucher Qty: Used to define how many vouchers to generate. Customization required to implement this feature.
- Ache Points: Similar to Incentive Dollars, but in a different currency. Customization required to implement this feature.
- Customer Points: Similar to Incentive Dollars, but in a different currency. Customization required to implement this feature.
- Game Credits: Similar to Incentive Dollars, but in a different currency. Customization required to implement this feature.
- System Credits: Put the specified credits in System Currency into Personal Account.
- Description of System Currency can be configured through WebText.
- Executive Credits: Similar to Incentive Dollars, but in a different currency. Customization required to implement this feature.
- Enroller Training Credits First: Put the specified credits in Training Currency into Personal Account of Enroller for the first order of Enrollees
- Enroller Training Credits All: Put the specified credits in Training Currency into Personal Account of Enroller for all orders of Enrollees.
- Member Training Credits: Put the specified credits in Training Currency into Personal Account
- Misc1: Can be tied to special details by INS at request.
- Misc2: Can be tied to special details by INS at request.
- Misc3: Can be tied to special details by INS at request.
- Only Show in Country: This will make an item show ONLY in the countries specified, so called White List of countries.
- Don't Show in Country: This will make an item NOT SHOW in the specified countries, so called Black List of countries.
- Allowed Flags to View: This must work with Allowed Product Level flag of users. The product will be shown to members with the specified flagged value of Allowed Product Level only. This can be used to restrict some special products to be available only to a group of chosen users.
- Maximum Purchase Allowance: You may enter a limit under Value which specifies the maximum lifetime limit for purchases of this product. Users will not be able to purchase more than this amount. This is a cumulative limit for the lifetime of the user's account.
- When making a purchase, the shopping cart checks to see how many times the person has previously purchased this product.
- The shopping cart also checks pending orders. So, the total number checked against is Purchases + Pending.
- If this number equals the limit, then further purchases are prevented for that user.
- Taxable Price Distributor: This is the price to be used for Tax Purposes when calculating tax for a Distributor.
- This value controls the Wholesale price of this item. It allows you to override the tax calculation for the distributor purchase of this item.
- Taxable Price Retail: This is the price to be used for Tax Purposes when calculating tax on a Retail Purchase.
- This value controls the Retail/Customer price of this item. It allows you to override the tax calculation for the retail purchase of this item.
- Packaged Product Identifier: Gives a unique ID to this product as being a collection of products in a package.
- This works with total volume and total amount as well as total quantify of products to be selected (as specified next).
- This type of packaged product if selected forces the purchase of a certain quantity of products (as specified next).
- Packaged Product Quantity: Specifies the quantity of products that need to be purchased before the user can leave the shopping cart.
- Packaged Product Volume: Specifies the volume (associated with the products) must meet the criteria before the user can leave the cart.
- Packaged Product Amount: Specifies the amount (associated with the products) must meet the criteria before the user can leave the cart.
- Packaged Product Tolerance: Specifies the allowed tolerance for above total volume and total amounts of the package.
- Packaged Product Charge Total Price: You can decide if an optional to be charged at total amount of individual amount or not.
- Packaged Product Charge Tax In Proportion: You can decide if an optional to charge the tax in proportion or not.
- Package ID-Optional Product: Identifies this product as belonging to a Packaged Product Group. It ties in with Packaged Product Identifier.
- If selected as a part of a package (this product attracts zero cost), it only charge the cost specified under Packaged Product Identifier.
- Package Product Use Item Price: Ignore the rules for Packaged items; Use the values of the each items to calculate the Package Cost.
- Bargain Price: The Phase 1 Price of a Bargain for Bargain Points. Do not worry about this if you don't use Bargain Points.
- Bargain Price P2: The Phase 2 Price of a Bargain for Bargain Points. Do not worry about this if you don't use Bargain Points.
- Bargain Price P3: The Phase 3 Price of a Bargain for Bargain Points.
- Comm1: Specify commission amount for a certain commission type.
- Comm2: Specify commission amount for a certain commission type.
- Comm3: Specify commission amount for a certain commission type.
- Comm4: Specify commission amount for a certain commission type.
- Comm5: Specify commission amount for a certain commission type.
- Alt. Retail Commission Amount: Specify the alternative commission amount for retail bonus.
- If you set this vale to 10 then the retail commission on this product sale would be 10.
- This is not the usual difference between Retail and Wholesale price.
- FSB Product Level: Specify the Fast Start Bonus payout levels associated with this product. Current system handles 2 levels.
- The product with higher payout needs to be level 2 and the Product with lower payout will be level 1.
- FSB Amount: Specify the Fast Start Bonus payout amount of specified product level.
- QEB Product Level: Specify the Quality Enroller Bonus payout level associated with this product.
- The product with highest QEB Total payout needs to be highest level.
- The product with second highest QEB Total payout needs to be second highest level.
- The product with lowest QEB total payout will be level 1.
- QEB Total Amount: Specify the Quality Enroller Bonus amount associated with this product.
- QEB Level 1 Amt: Specify the Quality Enroller Bonus amount on 1st generation.
- QEB Level 2 Amt: Specify the Quality Enroller Bonus amount on 2nd generation.
- QEB Level 3 Amt: Specify the Quality Enroller Bonus amount on 3rd generation.
- QEB Level 4 Amt: Specify the Quality Enroller Bonus amount on 4th generation.
- QEB Level 5 Amt: Specify the Quality Enroller Bonus amount on 5st generation.
- Flag Ty: Specify the Flag Type that you want to set for the user to upgrade to after the purchase of this product.
- Flag Value: Specify the value/rank for the flag type you want to set for the user to upgrade to after the purchase of this product.
- Flag Period: Specify the number of commission periods to be flagged for on purchase of this product.
- Autoship Interval: Specify the time interval of autoship if it is greater than 1 month, on purchase of this product.
- Autoship Start Month: Specify when autoship should start in the specified number of month on purchase of this product.
- Autoship Item Code: Specify the Item Code to be added into autoship when the product is purchased.
- Product Email ID: Specify the email template ID of the email that will be sent out on payment of the order. Get the details from the Email Engine page. Open up the Load Email Template drop-list and check out the Email ID. Check out the Send Email on Product Purchase manual.
Related Links:
Package Selection Feature
Country Blacklist or Whitelist