Click on the Distributor option in the left hand menu or under the General section of the home page to go to the Distributor Search interface. Then search for the member in your system by providing the Username, Name or any other relative criteria, and then by clicking on the Search button below.
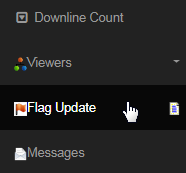
Once you are in the Distributor Maintenance area of the member, click on the Flag Update option in the left hand menu to go to that page.

The Flagging function allows you to qualify members at levels they do not deserve. While we do not agree that this is a good idea, we do recognize sometimes it is necessary to promote a member to a certain rank manually. Hence, we have included this function in our system to make it flexible.
This will be based on your system settings and what you have had us program for you in this area. It could be a qualification or rank flag, allowing the members to get paid even if they are not on autoship, flag to override a group volume setting, etc. - the possibilities are pretty much limitless.This will redirect you to the Distributor Flag Update interface, where you can add a new title or manage the existing one. The table at the top of the page contains the mechanism to define the Flag. Below that tool is the description of the Flags, their values and the functionalities. Lets check them out.
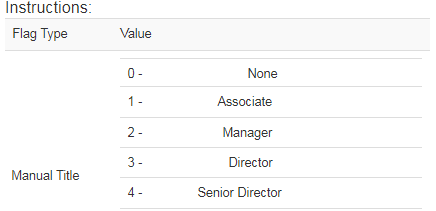
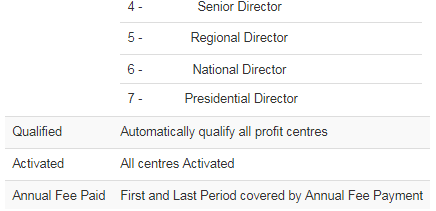
Before you take your action, have a look at the Instructions below to learn about the values of the Flag Type. The ranks of the members and availability of the Flag Types may differ based on the commission plan and your business requirements. Here's an example of what the Instruction may look like.


In order to add a new flag to the user, simply define the values of the flag as described below and then click on the add flag button at the end of that row.
- Flag Type: The name of the flag or the system term used for a particular flag (explained below).
- Value: The value of the flag you want to use, which will correspond to the legend at the bottom of the page.
- Start Period: What commission period do you want this flag to start. If in doubt, enter 1, i.e. first commission period.
- End Period: What commission period do you want to stop this flag from being used. Enter 9999 for permanent (infinite).

You can easily update a Flag Type for a user by simply editing the values and then by clicking on the corresponding Update button to save the changes. It is required by the member to refresh the page or re-login to the account to view the changes. To remove a flag, simply click on the Delete button.

- If you set a Manual title flag for a distributor, then that distributor still needs to cover the system minimum required volume to avoid a volume flush. He will still get other commission types for his flagged title. In that case, he would only lose his binary commissions as set in the system.
- When you set someone to Maintained, you can also choose a title by setting the value. This means that he will be maintained at that title and will receive all the benefits of that title as well. The value should be set to 1, and this would work regardless of the title. The points will never get flushed.
- Non-Compress flag is used to prevent a member from being compressed for the specified commission period duration. Click here to learn more.
- Allowed Product Level is also known as FlagTy 19. The purpose of this flag is to restrict the display of certain products only to a certain set of users (who are flagged). To learn more about using this flag feature in the system, check out the Connecting Flag To A Distributor tutorial page.
- While defining a product with a certain Flag Type, note that you also need to define the Flag Period and Flag Value in the Product Details section. Failing this, the Flag Type will not work and won't be applied to the member. This should be done to all products that have a defined FlagTy.
