This function allows you to qualify members at levels they do not deserve. While we do not agree that this is a good idea to do, we do recognize sometimes it is necessary to promote a member to a certain rank manually. So we have this function included in the system to make it flexible.
This area will be based on your Commission Plan and will include flags for rank and maintaining status.The customization possibilities are pretty much limitless to the flag interface in order to suit your business needs beyond simple rank and maintenance flags. Let's see how it works.
Click on the Distributor option in the left hand menu or under the General section on the home page to go to the Distributor Search interface.

Search for the member in your system by providing the Username, Name or any other relative criteria, and then by clicking on the Search button.
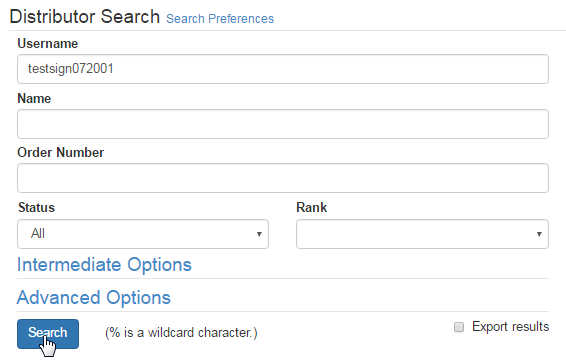
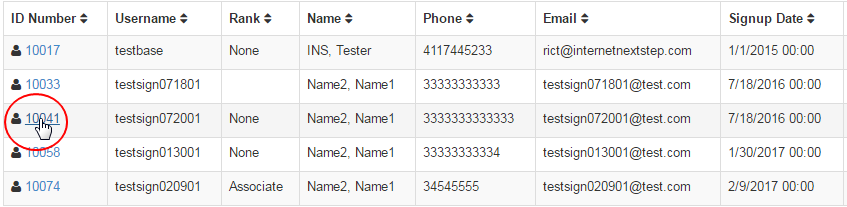
If you are not sure about the search criteria, i.e. username or name of the member, then simply click on the Search button without specifying any of the fields to get the complete list of all the members in your system. And then, click on the ID Number for the user you want to connect the flag to.
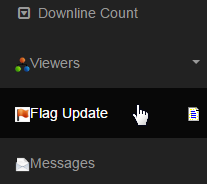
Now you should be inside the Distributor Maintenance area of that user. Scroll down the left hand menu and click on the Flag Update option.
In the Distributor Flag Update interface, you can add a new title or manage the existing one. To add a new Flag, select the Flag Type from the drop-down list, enter the Value for the Manual Title, set the Start Period and the End Period and then click on the corresponding add flag button (UPD column).
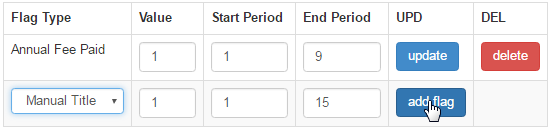
In order to update an existing flag, simply edit the values as required and then click on the corresponding update button to commit to the changes.
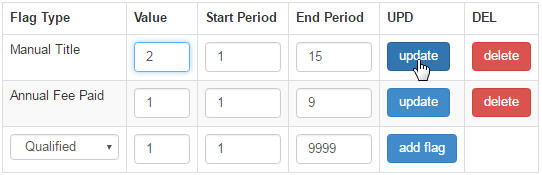
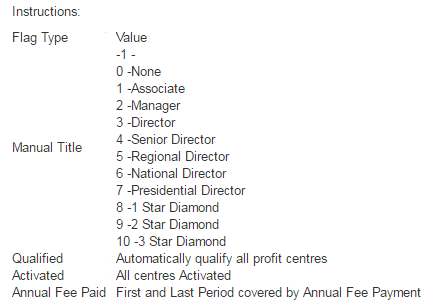
- Check the description of the Values of the flag you want to use, which will correspond to the legend at the bottom of the page.
- Start Period: The commission period for which you want the flag to take effect. If you are in doubt, enter 1 (first CommPeriod).
- End Period: The commission period for which you want to stop this flag from being used. Enter 9999 for a permanent period.
- To remove a flag type (for this user) from the list, simply click on the corresponding delete button. This process is irreversible.
- Manual Title: If you set a Manual title flag for a distributor, then that distributor still needs to cover the system minimum required volume to avoid a volume flush, but he will still get other commission types for his flagged title. He would only lose binary commissions as set in your system.
- Annual Fee Paid: It is used to apply to retail bonus. but we don't restrict this to any other places unless it is specified in the commission plan.
- Maintained: You can choose a title by setting the value for a user to be flagged as Maintained. This means that the user will be maintained at that title and he will receive all the benefits of that title as well. He does not need to cover the system required volume. His points will never get flushed.
- Non-Compress: This flag is used to prevent a member from being compressed for the specified commission period duration. In other words, if the compression feature is enabled in the system, the member will not be compressed out of the placement tree and will not receive warning emails.
- Allowed Product Level: Also known as FlagTy 19. The purpose of this flag is to restrict the display of certain products only to a certain set of users (who are flagged). For example, you have a few products which are meant to showcase only to the users who get to the rank of Gemstars.
- This flag works in co-ordination with the Allowed Flags to View attribute in the Product Details section of the Product Edit page.
- If a member is flagged as Allowed Product Level with the value 2, then he would see the products which have Allowed Flags to View as a value of 2 or products without that attribute defined. In this way, you can configure the products to be displayed for different user ranks.

- You would also find the attributes named as FlagTy, Flag Value and Flag Period in Product Maint. If a product has these attributes configured, the user purchasing the product would be flagged for that Flag Type with specified values, once they have paid for the order.
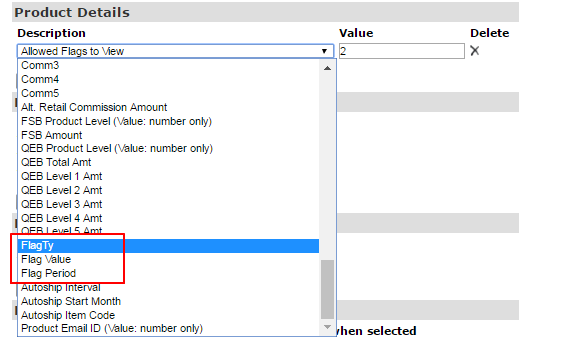
- For example, I've added those attributes to product "10100-AS". FlagTy 19, value 2 meaning Gemstar, period 9999 meaning flagged for good. So if a member paid for the product "10100-AS", the member will be flagged as "Gemstart" from the month of the order.
- PLEASE Keep in mind that IF your commission plan is breakage based, gifting rank too often can create an extreme climbing of your payout.
- Setting a Rank Title will NOT change the title seen in the Members Area UNTIL your next commission run has successfully completed, or your current one, if it is still open, is Re-run. In other words, in order to display the latest title, you need to update the CommRun for that period.
- It is recommended that before you start flagging members, you contact INS (either contact via Support Skype or lodge the issue in a bug.) to get an opinion on the risk. Both Matrix and Binary commission plans that are breakage based can be significantly affected by the flagging of members.
- We have seen clients with properly designed 50% payout commission plans SPIKE to over 80% as a result of Flagging too many members at a higher rank. Make sure that you are aware of the risk associated. In case of any query, please contact INS Support or report a mantis bug.