The third quadrant in the members lounge contains the quick access functions to the payment related modules - transfer, withdrawals, etc. This manual is split up into tabs to make it compact and flexible. Navigate through the manual by clicking on the respective tabs below. Here's a description of the tabs;
This is where the member can check the balance in his personal account (and other accounts if applicable) and the recent transactions. At the top section in this area, the currency types which are made available in the system are shown. The reports below will reflect based on the currency type chosen.
Click on the Currency code link to view the balance and the transaction in that type. The Balance section would display the results accordingly;
- Reserved Funds: The amount requested for withdrawal in the selected currency type and pending for admin approval.
- Total Funds: The balance (minus reserve funds) in the Personal Account of the member for the selected currency type.
- Note that if the withdrawal request is declined by the admin, the Reserved Funds will be added back to the Total Funds.

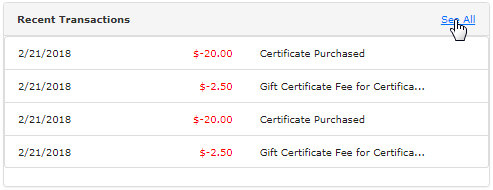
Next comes the Recent Transactions table which displays the summary of the latest four transactions from newest to oldest - the table column includes the transaction date, transaction amount and a short description. To view the complete list of the transactions, click on the See All link in the table header.
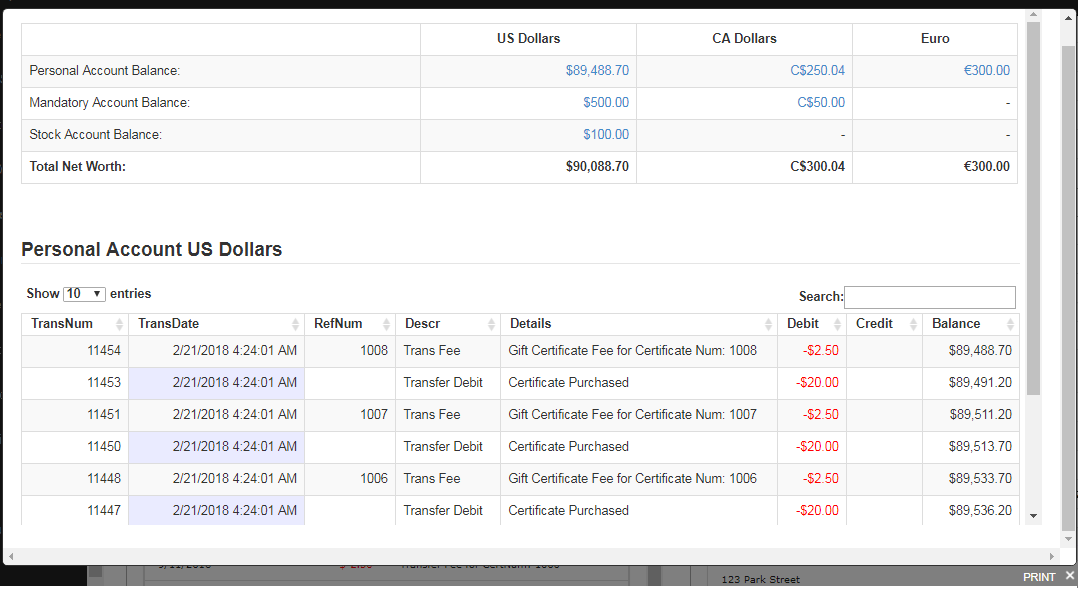
Clicking on the See All link would bring up the Account Summary page which details the current balance in all the accounts of the member and in all types of currencies available. Below the balance summary table, the system displays the list of the transactions for the currency (as seen in the table header).
- Click on the amount link in the balance summary table to load the list of transactions for that account-currency type. Navigate through the list, search for a transaction or even manage the active withdrawal requests (if any). Check out the DistMaint - Account manual page to learn more.
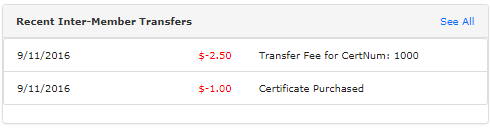
At the bottom, there's the Recent Inter-Member Transfers table which contains the summary of the latest transfer of funds that the member had between other members of the system. To view the complete list, click on the See All link in the table header. It would bring up the same window as described above.
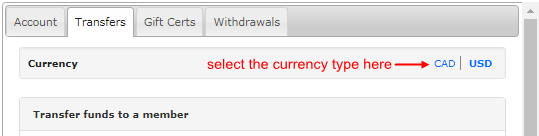
This is where the member can send money to another member in the system from his Personal Account balance. First off, select the currency type in which you want to transfer the funds. Click on the Currency code link at the top. All the types that are made available in the system will appear here.
Before you take any action, please read the instructions in the blue box. The information may contain a minimum and maximum limit of transfer, the time taken to process the transfers, and the service charge levied for each transfer. The admin holds the sole responsibility to change the instructions as needed.

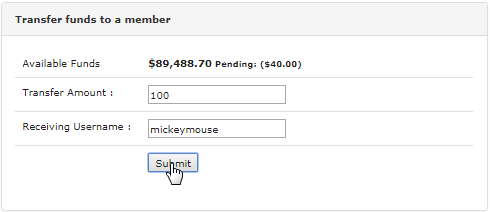
Once the system loads the respective data for the selected currency type, fill in the required details in the Transfer funds to a member section as described below and then click on the Submit button to proceed. The system would display a warning/error message if any wrong data has been entered.
- Available Funds: The balance in the member's Personal Account. Pending is the amount the member requested a withdrawal for. The Available Funds does not include the Pending amount. If the withdrawal request is declined, the money would be added back to the Available Funds.
- Transfer Amount: Enter the amount to be transferred. Make sure the transfer amount does not exceed the Available Funds.
- Receiving Username: Enter the username of the member to whom the funds will be transferred. Make sure to enter the correct username.
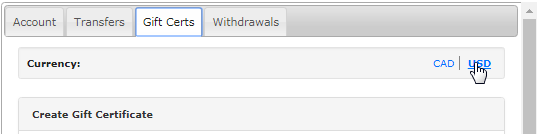
This is where the member can create or redeem gift certificates. First off, select the Currency type in which you want to create the gift certificate from the top row and let the system load the data for you. The currency in which the member has a balance will appear as currency code links.
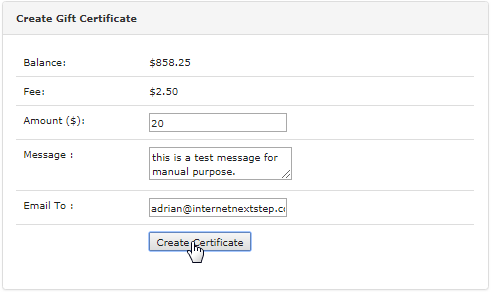
In the Create Gift Certificate section, fill in the details of the certificate as described below and then click on the Create Certificate button to proceed.
- Balance: The balance in the members Personal Account in the selected currency type.
- Fee: The amount of service fee charged by the company to create a new gift certificate.
- Amount: How much the certificate should be for? It should not exceed the Balance + Fee.
- Message: Type in a custom message for the recipient - would be included in the certificate.
- Email To: Enter the email address of the recipient where the gift certificate details will be sent.
- The amount of the service fee charged for creating a new gift certificate is decided and managed by the admin.
- Make sure you leave enough funds behind to cover your orders and autoships to avoid future errors.
- The email sent to the recipients contains the password to redeem the certificate as well as other details.
- Ensure that you have entered the correct email address of the recipient to avoid any misuse of the certificate.
The system also provides the member with the ability to create a set of gift certificates all at once, termed as Bulk Gift Certificates. In this section, you need to enter the Amount that each certificate would be worth and the number of certificates you want to create. Then click on the Generate Bulk Gift Certificates button.
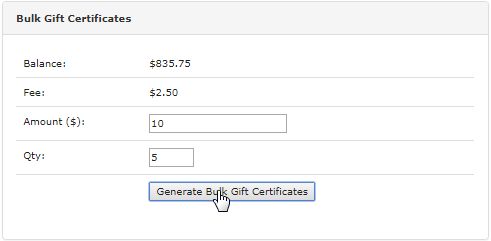
You will notice that the summary of gift certificates (as many as you have created) will be displayed in the Recent Gift Certificates section. For Bulk Gift Certicates, the email addresses of the recipients are not required. You can send the password along with a message and details via email, SMS, etc.
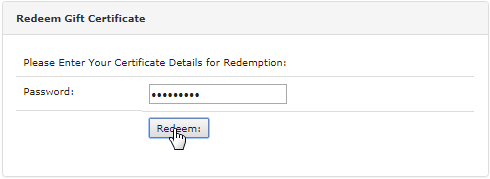
In this section, the member can redeem a certificate gifted to him by another member. You just need to enter the Password and click on the Redeem button. This quick access is an alternative way to the Gift Certificate > Redeem page. Check out the Members - Redeem manual page to learn more.
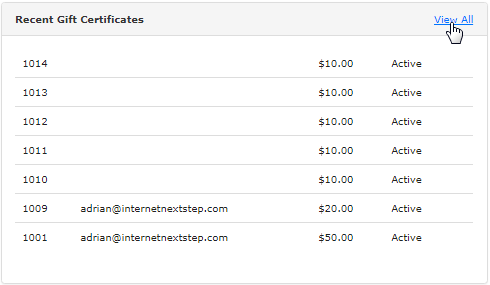
In this section, you will be shown the list of gift certificates created (by latest) in a summarized version, displaying the certificate number, recipient's email address (not for bulk creation), worth and the current status of the certificate. To get the full details and list, click on the View All link in the section header.
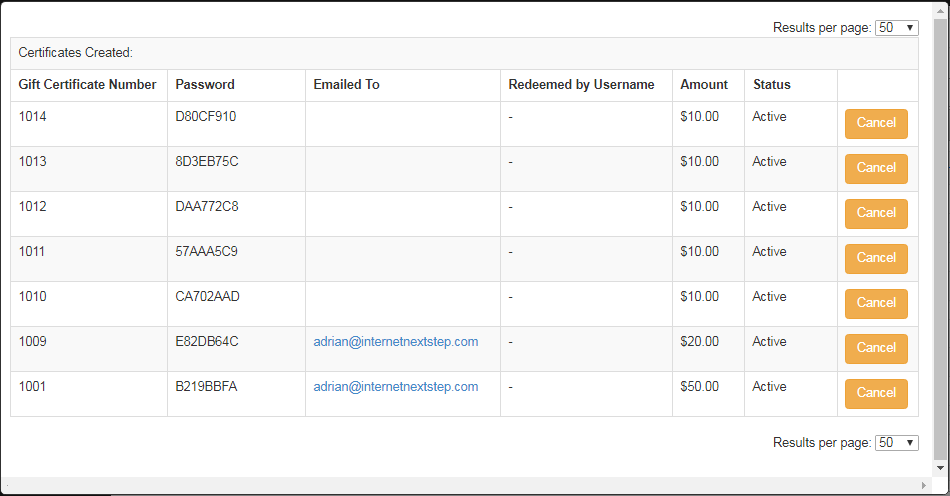
This will bring up a window containing the list of Certificates with the following details. The certificates with Active status can be cancelled. To do that, simply click on the corresponding Cancel button. The amount of the gift certificate will then be added back to the members Personal Account.
- Gift Certificate Number: The unique gift certificate number generated by the system.
- Password: The password for redeeming the gift certificate.
- Emailed To: The recipient's email address. Not applicable for the certificates generated in bulk.
- Redeemed by Username: The username of the recipient who has redeemed the certificate.
- Amount: How much the certificate is worth? The certificates would appear for the selected currency.
- Status: The current status of the gift certificate, i.e. whether it is Active, Redeemed or Cancelled.
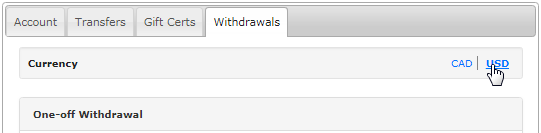
In this tab, the member can enter his details for withdrawing funds from his Personal Account. At first, select the Currency type in which you want to withdraw the funds, from the available options, by clicking on the currency code link. The member should have a balance of funds for a currency to display in this section.
The system would load the available balance in the One-off Withdrawal section based on the currency type you have selected. Next, enter the details as described below and then click on the Next button to proceed. Entering an incorrect withdrawal amount would result in system error/warning messages.
- Net Available for Withdrawal: Displays the balance in the member's Personal Account that can be withdrawn (minus Pending if any).
- Request Amount: Enter the amount that you want to withdraw. Make sure it does not exceed the Net Available for Withdrawal balance.
- Payment Method: Select the payment method by which you want to withdraw the funds from your Personal Account, from the drop-list.

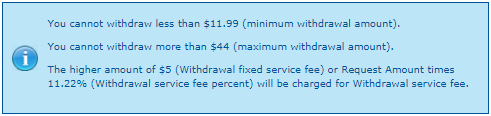
As you select the payment method, the terms and conditions set by the company for that payment method would appear in a blue box above that section.
- Ensure that you have read the instructions carefully before taking action. In our example, we would select to withdraw funds by Cheque.
Once you click on the Next button, a details field for that payment type would appear. Enter the correct details and then click on the Submit button. If you wish to edit the withdrawal amount, then click on the change link next to the Amount Requested field. It would take you back to the previous step.
- Withdrawal Payment Type: The payment method selected for withdrawal (in the previous step).
- Amount Requested: The amount requested for withdrawal. You can edit the requested amount.
- Plus Service Fee: The amount of service fee charged by the company for that payment method.
- Below these attributes will appear the details field of the payment type chosen - may vary for each type.

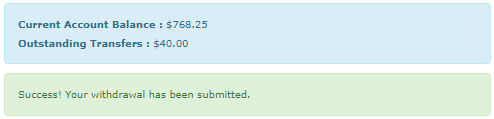
Upon submitting the request; if everything goes well, you will see a Success message and a new box displaying the balance information as follows;
- Current Account Balance: The balance in the member's Personal Account before submitting the withdrawal request.
- Outstanding Transfers: The amount requested for withdrawal. This would be deducted from the Current Account Balance.
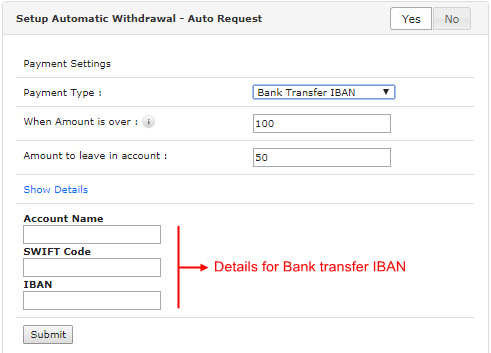
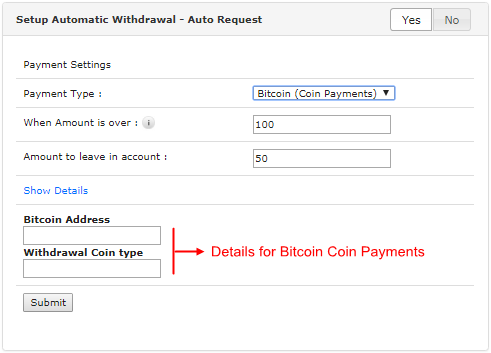
The withdrawal process explained above is manual. The member can also opt for an automatic withdrawal, where the system would trigger the withdrawal process automatically on behalf of the member. To turn on this feature, click on the Yes button in the Setup Automatic Withdrawal - Auto Request header.

The Payment Settings fields would expand below where you can do the setup as follows. Click on the Submit button to save your preferences.
- Payment Type: Select a payment method by which you want to withdraw the funds from your Personal Account, from the drop-list.
- When Amount is over: Triggers the automatic withdrawal request when the amount exceeds the balance in the member's Personal Account.
- Amount to leave in account: The minimum balance that would be left behind in the member's Personal Account after the withdrawal.
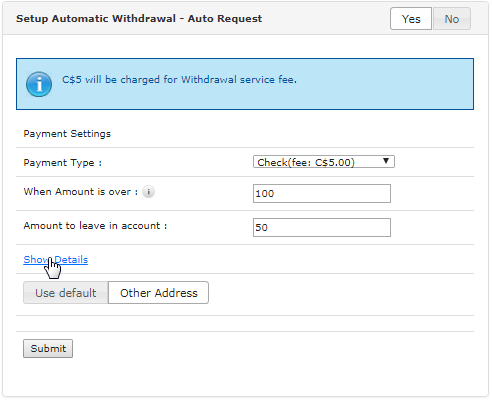
- If there's any withdrawal service charge levied by the company (or any other instruction) for the payment method you select, the message for the same would appear in the blue box above. The admin is responsible for updating this information with or without any prior notice.
- In our example (screenshot above), the automatic withdrawal request would be triggered when the balance in the member's Personal Account exceeds $100, and the amount to leave in the account would be $50. Lets say the balance in the account becomes $110 after earning a commission. The system would then trigger an automatic withdrawal request of $60 on behalf of the member in the selected payment type.
- The fields for entering the data for the selected payment type would appear below by default. If not, then click on the Show Details link.
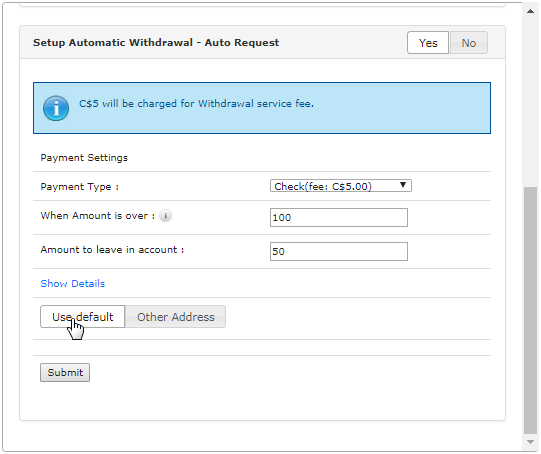
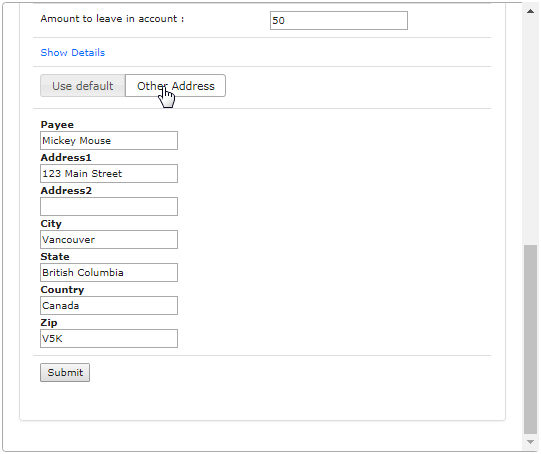
Only the payment method made available in the system will be displayed. In our example, we have selected the Payment Type as Cheque. You may use the default Cheque type saved in Finances > Payment Types. In that case, simply click on the Use default switch below the Show Details link to apply.
- You can use a new Cheque address by clicking on the Other Address switch, followed by entering the details for the same in the fields below.
You may also choose any other payment type for withdrawal. The respective detail fields would display. Here are two samples;
Re-check all the details you have entered to ensure they are correct to avoid mispayments. Then finalize your action by clicking on the Submit button below. A success message would flash at the top right corner of the page confirming your action. You can disable the automatic withdrawal request anytime by clicking on the No switch in the Setup Automatic Withdrawal - Auto Request header. For any questions, check with support.
