Mantis Bug Tracker is a Web based bug tracking system, where you can REPORT an issue or ask any question to the INS team regarding the system. Hence, it is very important to learn how to use the Mantis system before you start with the other tutorials to configure and design your system.
- Once we create your account in the Mantis System, you should receive an Account Registration email in your email address (registered with INS). It contains an activation link, which redirects you to the Mantis Login page, where you need to set you own access password.
- You should receive a system message, Your account information has been verified. Type in the new password in the confirm password field (double check for any errors). Then click on the Update User button. Now you are successfully linked to the Mantis System with INS.
- If you would like to add your team members into mantis, then go to the Mantis Tutorial bug, add a note providing the details of the user and then assign the bug to support. Read the instructions carefully in that bug before you act. You can also notify us via support Skype.
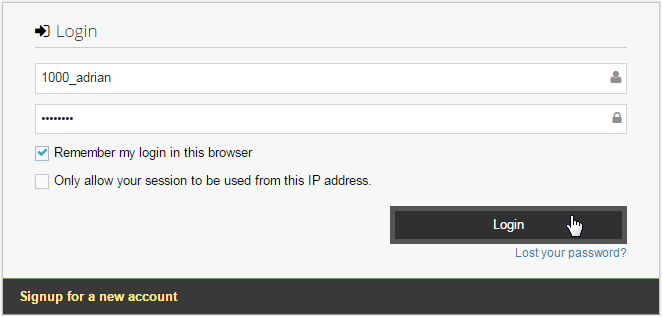
Go to the INS Mantis Login page. Mantis Lives at: http://www.mlm-software-mantis.com. We suggest you bookmark this page for quick access.
- Enter your username (provided to you by INS) and your password. Check the Remember my login in this browser for future reference.
- Then click on the Login button. You will have to have cookies enabled in your browser to login. If the account does not exist (system does not recognize you), the account is disabled, or the password is incorrect, then you will remain on the login page. An error message will be displayed.
- DO NOT click on the Signup for a new account link (this will not link yourself to our system). You account will be created/setup by INS.
- If you are unable to sign in to your account or have forgotten your password, please contact INS Support to help you regain access.
It is a very common mistake that new users try to enter mantis with their INS MLM Software username. You can prevent this mistake by keeping in mind that ALL MANTIS usernames begin with 4-digits (which is your system number) and an _ (underscore sign) followed by your first name.
For example, 6000_adrian; 6000 is the system number and adrian is the first name of the user. The username will be provided to you by INS.
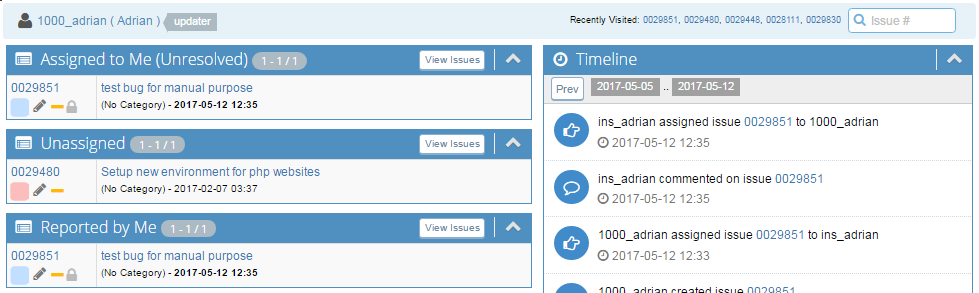
Upon login, you will be presented with the My View interface, which provides the summary of the BUGS that are linked with your project. The interface is classified into various sections, satisfying individual purposes. Click on the arrow icon in the section header (right hand side) to expand the same.
- The section names describe the content of that section - it's self-explanatory. Only the latest bugs (up to 10 bugs) are displayed in the list.
- The bugs that appear in bold text represent that they are not "marked as read". To get the full list of a section, click on the View Issues link.
- Every list contains the details of the bugs in a summarized form with number, status, title, priority, category, date created, and the option to edit.
- In order to edit the details of the bug, click on the small pencil icon to open it in an editable format. To learn more about editing a bug, click here.
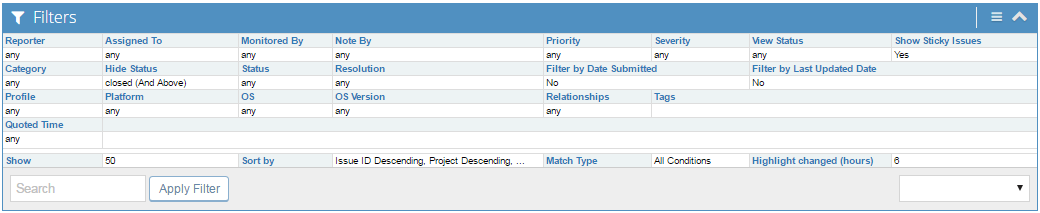
Here we can view the issue listings. The page has a set of viewing filters at the top and the issues are listed below with the following attributes:
- ID: It is the unique bug number auto-generated by the system used to represent the issue. Click on this link to open the full bug.
- Project: It is the system project name to which you and your team members are linked (in mantis). Usually your company name.
- Status: It displays the current status of the bug (along with its color code) and to whom it is assigned to (for your reference).
- Number of Issue Notes: Denote by notes symbol, this column show the total number of notes that are added to the certain bug.
- Attachment Count: Denoted by chain symbol, this column show the total number of files that are attached to the certain bug.
- Updated: It displays the the date on which the bug was last updated. The date is displayed in the year-month-day format.
- Summary: It is the summary or the title of the bug. It is basically a short description of the issue you enter while reporting the bug.

- The Bug ID is a link that leads to a more detailed report about the issue. Click on the link to view the bug in details.
- The number in the issue note count column will be bold if an issue note has been added in the specified time frame.
- The addition of an issue note will make the issue note link of the issue appear in the un-visited state.
- The Updated column will be bold if the issue has changed in the last "Changed(hrs)" field (specified in the viewing filters).
- Moving the mouse over the status text will show the resolution as a title. This is rendered by some browsers as a bubble.
The filters control the behavior of the issues list. The filters are saved between browsing sessions but do not currently save sort order or direction. To change the value of a field, click on the Filter name to enable that field for editing. Then click on Apply Filters button to save and apply the changes.
- If the number of issues exceeds the Show count in the filter, a set of navigation buttons are added at the top and bottom of the table,
- The Search field will look for simple keyword matches in the primary Issue details section. It does not search through issue notes.
The system also gives you the ability to print and export the bug report in CSV and Excel file format. Notice the three buttons at the top of the table in the Viewing Issues section. Click on the buttons to initiate the respective function of printing and downloading the files as and when required.
- Print Report: After you click on this button, the system will bring up the list of all the items. You need to select the ones you want to print and then click on the Display selected only button. Next choose your option (top left corner) to download it in word document or open in browser.
- CSV Export: Clicking on this button would trigger the system to download the report in a CSV file format, in your computer.
- Excel Export: Clicking on this button would trigger the system to download the report in an Excel file format, in your computer.

Related Links:
Reporting an Issue
View and Update a Bug
Mantis FAQs