The second quadrant displays the how the member fared in earning commissions and promotions. The reports are fetched from the database. This manual area is split into tabs to make it compact and flexible. Navigate through by clicking on the respective tab below. Here's a description of the tabs;
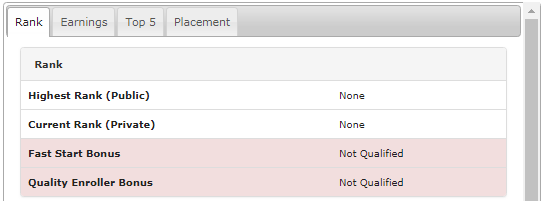
The area in this tab is divided into two tables - the first one displays the current title status of the member and the other one displays the requirements for the next level. The purpose is to motivate the members for further achievements. Here's a description of the rows in the Rank table;
- Highest Rank: The best rank or title the member has ever achieved. | Current Rank: The rank or title the member is currently holding.
- Fast Start Bonus | Quality Enroller Bonus: Whether the member is qualified for the Fast Start Bonus and/or the Quality Enroller Bonus.
The Qualifications Needed to reach [next_rank] table constitutes the attributes that are required to be fulfilled over the course of time. These items are specified in the company commission plan and are setup in the system accordingly - the conditions may vary. The column states as follows;
- Current: How much of the respective entity has been currently achieved by the member.
- Req'd: How much of the respective entity is originally required to obtain the next rank.
- To Go: How much of the respective entity is currently pending to fulfill the Req'd value.
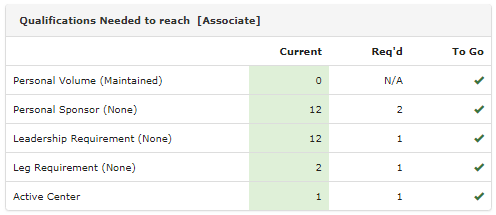
The value of the To Go column will be replaced by a green check icon if the condition is fulfilled. The rank report updates along with the commission run.
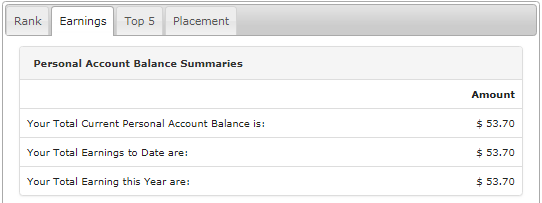
This tab fetches out the report on member's earnings-by-commission. There are two tables displayed in this area highlighting the respective details. At the top, it displays the Personal Account Balance Summaries table with the following details. The amount displayed here is in the default currency type.
- Your Total Current Personal Account Balance is: The current amount of funds in the member's personal account.
- Your Total Earnings to Date are: The amount of commission the member has earned till this date (since signing up).
- Your Total Earnings this Year are: The amount of commission the member has earned in the current financial year.
The table Historical Earnings by Commission Period displays the earnings summary based on the commission period in a decreasing manner as follows;
- CommPer: The commission period for the commission earned is displayed. | Total Earnings: The commission earned in the respective period.
- View All: Click on this link to view the complete list of the historical earnings. A window will pop-up containing the extended list of the table.
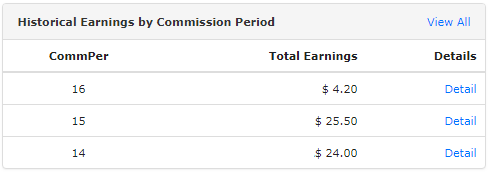
The Detail link at the end of each row would provide you the same for that CommPer. Click on the link for the CommPer you want to view the commission summary of. You will then be redirected to a dedicated page carrying the details as setup. To go back, click on the Return to Members Menu link.
- The items in this report are based on the commission plan type and how the system is designed for the business. Here's a sample details report;
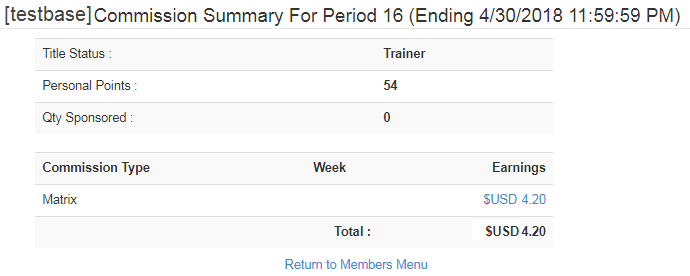
The earning report may not be in real time due to its nature of crashing the server. The report is updated after the commission run is successful. It may take a day for the current reports to be reflected in the members lounge. In some cases, a table showcasing the volume of the current period can also be setup.
This area fetches out the report displaying the usernames of the 5 members who have topped the list, based on a certain time period, i.e. top 5 members who have sponsored the most for the respective period. The period can be based on the week, month, year and forever (start of the company).
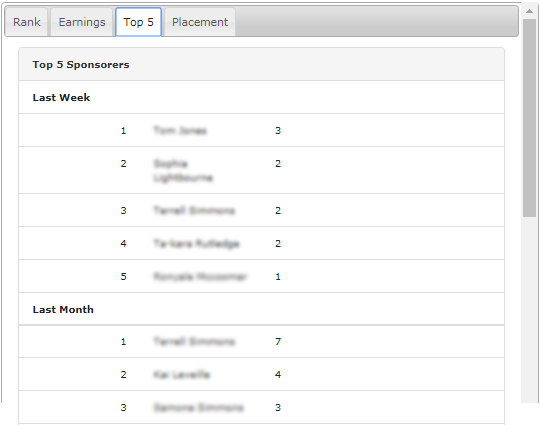
This is a global report and is displayed to all the members in the system. The report is populated after the commission has been run. It may take 24 hours after the commission run to reflect the actual results. In case of any customization needed in this area, report a mantis bug with your requirements.
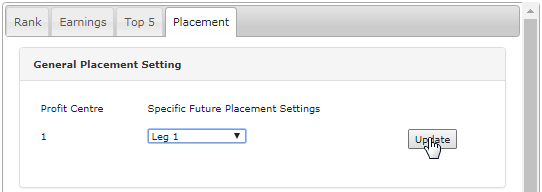
This area provides quick access to the placement preference and an alternative to the Tools & Settings > Place Pref page (described as follows).
- General Placement Settings: A member can choose which leg/side he wants to place his downlines. Select the Profit Centre (only relevant if you are a multiple centers company) and the side or leg of the downline tree the new signups would be placed. Then click on the Update button to save.
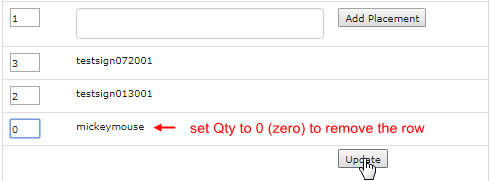
- Specific Future Placement Settings: Set the number of users to be placed under a certain downline member. Enter the Qty i.e. the number of new signups and the Username of the downline member under whom the signups will be placed. Then click on the Add Placement button.
- The list of the Specific Future Placement Settings would appear and will be processed in the order by which you have added the same. You can also change the quantity field by simply editing the value and then by clicking on the Update button at the bottom of the page to save the changes.
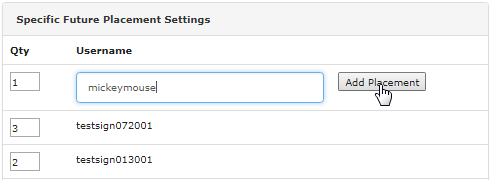
Note: The changes will take effect after updating the preferences and for new signups only. This won't change the existing placement of the downline.