Note: We suggest you to go through the Group Maintenance tutorial before you refer to the User Maintenance page to understand the concept.
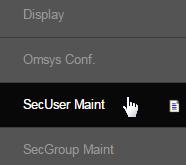
Go to Configuration > Admin > SecUser Maint from the left hand menu or click on SecUser Maint under Configuration on the home page.

In the User Maint area, you would find the list of the existing users who are currently in charge of operating the system. In order to add a new admin user, type in a username in the text-box provided at the top of the User Maintenance table and then click on the Add button next to it to proceed.
- Note that the username should note be more than eight characters. If the limit exceeds this, the system will show you a warning message.

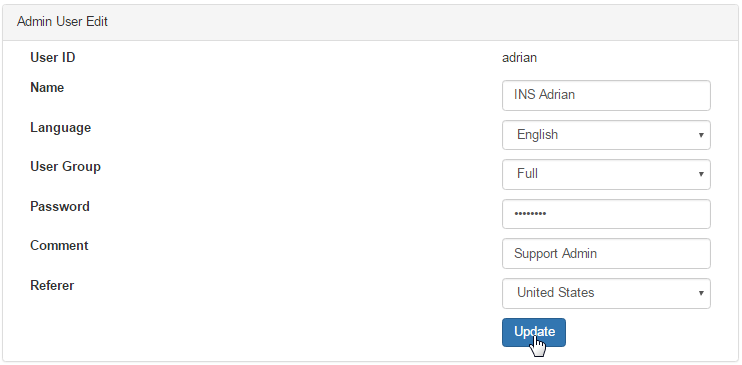
You will then be redirected to the Admin User Edit section, where you need to specify the details of the account that you are creating for the user. Enter the values of the attributes as described in the following points and then click on the Update button below to save the changes in the system.
- User ID: It is a unique identification code used to authenticate the user in the system (auto populated from the previous step).
- Name: Type in the full name of the user. This can also be a short description of the user group, i.e. Support Representatives.
- Language: Select the default language from the drop-down list, which the system will show the pages in to this user upon login.
- User Type: Here you set the access rights of the user from the drop-down list. See below for a description of the available options.
- Password: Specify a password to this account, and make sure that the password is minimum of 8 characters long. More details below.
- Comment: This space is for entering any additional identification information related to the person using the account
- Referer: Select a Referrer type from the drop-down list (available options) to which the user will be known.

After you have updated the details, the page will then refresh and save the information. Acknowledge the message displayed at the top of the page.

- Full: This is the Admin user type with all the powers i.e. controls everything in the system and must only be assigned to the owners.
- Do not allocate this level of access to just anyone; think of it as The keys to your website. May be assigned to certain developers.
- This level allows the admin user to view and manage the web pages that are not in use in the system and new pages being worked on.
- Senior Admin: Similar to Full, but cannot see the pages that are under construction or the pages not in system use currently.
- A good option to assign for top level administrators (using Full can still override them, so you still retain a certain level of control).
- Junior Admin: This user type does not have access to Reporting, Configuration, Email Engine, OMSYS Admin and Recognition areas.
- Senior Support: Mostly assigned to the admin of the support representative staff. Can look up a member and do FAQ help desk work.
- Junior Support: Can only do FAQ help desk work, without the ability to search for members and work on the details of a members account.
- All FAQ entries cannot be approved by a Junior; they can only be approved to go live by a Senior Support member of the system.
- Senior Translator: Has the ability to translate the system in other languages, and can also approve the translations by himself.
- Junior Translator:' Has the ability to translate the system in other languages, but cannot approve the translations done by him.
- It is only the Senior Translator who reviews and then approves the translations submitted by Junior Translators.
- No Access: This means NO access to the site. This access level is used to temporarily block the user from signing in to his account.
- Please note that the User Type or the access level also controls the visibility of some buttons, such as the Update button in the Status section in the Distributor Maintenance interface. Granting a User Type does not guarantee full functionality for every area available to that User Type.
It is recommended to use STRONG PASSWORDS. These should be a combination of numbers and letters, with no obvious words included.
- Do not use birth dates, person's names, addresses or other obvious information in the password.
- Make sure that the password is at least 8 characters long. Better if it is alphanumeric with special characters.
- Keeping to these rules helps to ensure you have a strong password which will be difficult to guess and crack..
This section controls user access to country specific site data. Initially there would be No records found for this user! while creating a new user. To start with, select the Country from the drop-list, select the Authorized option under the Authorization column and then click on the Add button next to it.

A new line will appear showing the new authorization. The user will now have access to the site data specific to that country. You can also update the Authorization preference by selecting the correct option from the drop-down list and then by clicking on the corresponding Update button.
- The user will now be denied/allowed access to site data specific to that country, depending on your chosen option.
- If you set "ALL COUNTRIES" to Unauthorized, then the entire row entry will be deleted or wiped out.
- This only applies to the entry "ALL COUNTRIES"; Singular country rows will be set to Unauthorized and remain visible.

To remove a country, click on the Delete button corresponding to that row. This removes the chosen authorization row completely. If it was the only authorization row the user had, the "no records found for this user" message will be displayed. Be careful before you act, because the process is irreversible.

This section controls user access to warehouses. Initially there would be No records found for this user! while creating a new user. To start with, select the Warehouse from the drop-list, select the Authorized option under the Authorization column and then click on the Add button next to it.

A new line will appear showing the new authorization. The user will now have access to that warehouse. You can also update the Authorization preference by selecting the correct option from the drop-down list and then by clicking on the corresponding Update button.
- The user will now be denied/allowed access to site data specific to that country, depending on your chosen option.
- If you set "ALL WAREHOUSES" to Unauthorized, then the entire row entry will be deleted or wiped out.
- This only applies to the entry "ALL WAREHOUSES"; Singular country rows will be set to Unauthorized and remain visible.

To remove a warehouse, click on the Delete button corresponding to that row. This removes the chosen authorization row completely. If it was the only authorization row the user had, the "no records found for this user" message will be display. Be careful before you act, because the process is irreversible.

This completes the setting up of an Admin User in your system with a certain role. To return to the User Maint area, click on the Back to User Maintenance link below. To go to the update section for any user, click on the Edit button next to that user. Contact INS Support for any query.
