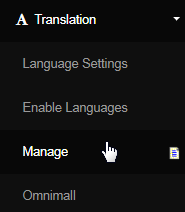
Go to Translation > Manage from the left hand menu or click on Manage under Translation on the home page.
This would redirect you to the Translation Engine interface, where you can alter the text entries which appear in your website pages. The page is divided into two sections. As an Senior Admin you would be given the access to all the functions related to the Translation interface. Let's check out the same;
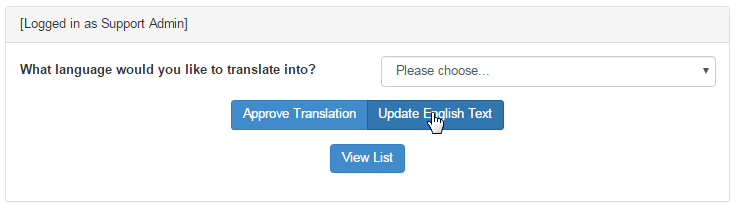
English is the default language of the system. In order to translate text content in English language, start by clicking on the Update English Text button.
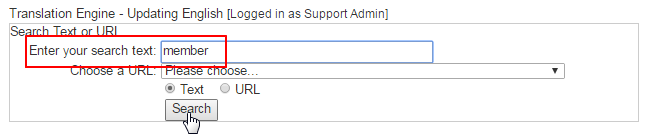
The Translation Engine - Updating English interface will open up, which would provide you with the search engine with the following filters/functions;
- Enter your search text: If you want to search for a single word or phrase, enter it in the text-box and then click on the Search button.
- This would search for that particular word or phrase in the entire system and bring up the list of all the pages that contains the word.
- This function is handy if you wish to change the word throughout the whole system. For example; replacing the term Member with Distributor.
- This may bring up many results, so if you would like to search in a particular page, take note of the page and select it from the drop-list.
- Choose a URL: If you know the page URL and want to change the content in that particular page only, then select the option from the drop-list.
- If it helps, you can get an idea of the page URL from the address bar of the browser. Open the system page and check it before searching.
- Once selected, remember to click on the URL radio-button (Text by default) and then click on the Search button to bring up the results.

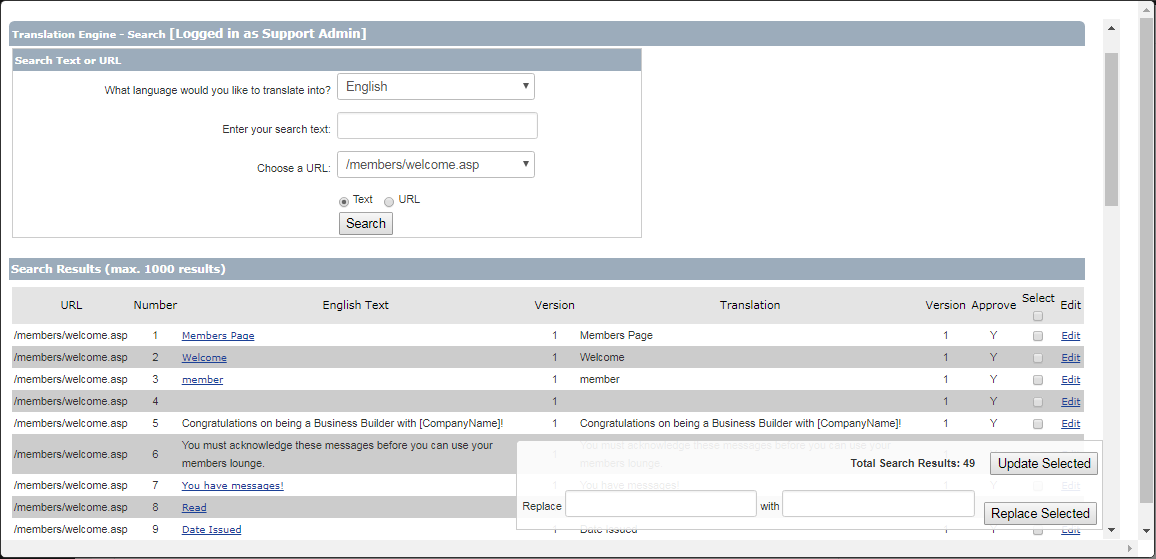
Below the search engine, the search result will be displayed with the page URL, line number, text content and the editable versions. Locate the text content you want to change/update and then click on the Edit link corresponding to that line to bring up the text content in an editable format (text-area).

Now edit the text in the box and then click on the Update Selected button (floating) at the bottom. Make sure that the corresponding Select box is checked (automatically gets selected after clicking on the Edit link). You can edit multiple lines at once, before saving, i.e. hitting on Update Selected.
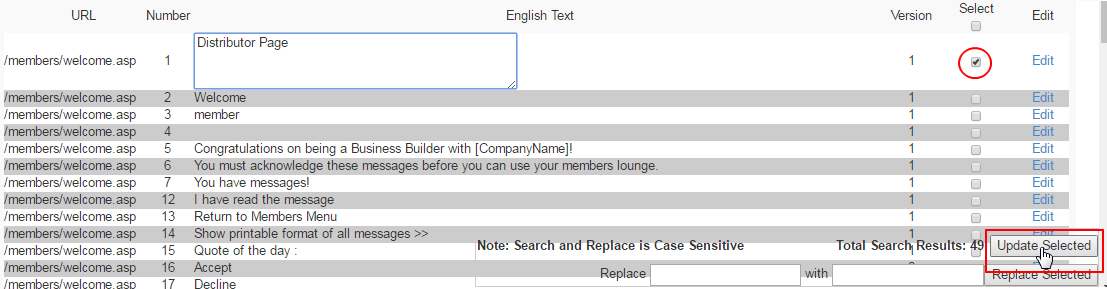
If you are required to change just one word on that page (via URL search) or the system (via Text search), then simply type in the words in the blank text box in the Replace section, tick on the Select check-box for the corresponding lines (where the words appear) and hit Replace Selected.
- Please note that the Search and Replace function is Case Sensitive. For example, replacing member with distributor is very much different from replacing Member with Distributor. In that case, you need to replace the same words appearing in capital and/or small letters.

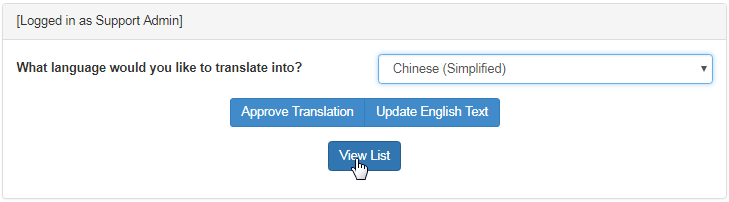
If not English, then choose the preferred option from the What language would you like to translate into? drop-list and then click on View List button.
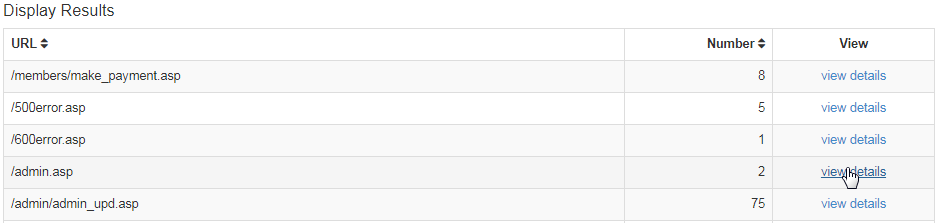
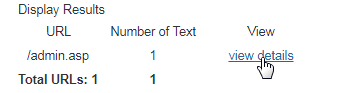
Next the list of all the pages for the chosen language will be displayed in the Display Results table along with number of lines the page contains and the option to edit. Click on the corresponding view details link (under View column) for the page that you want to translate (to get the full view of the page).
Above the Display Results list is the Search engine or URL pane. You can use these filters to narrow your search result as following. Once you you have selected the options, click on the Display button to start the process. The Display Results table will get refreshed with your recent criteria.
- What language would you like to translate into? Select a different languages from the drop-down list. This lets you toggle between languages.
- Which records to display? These options lets you focus on the display result by emphasizing on the search preferences as follows;
- All records: Show all the pages available for this language, irrespective of fact that they are translated or not. Returns all the web-pages.
- Translated: Returns only the pages that have been translated in the past. Each page holds the details of only the lines that are translated.
- Not translated: Returns only the pages that have not been translated. Each page holds the details of only the lines that are not translated.
- Choose a URL: You can search the page directly if you know the URL of that page. Select the option from the drop-list.
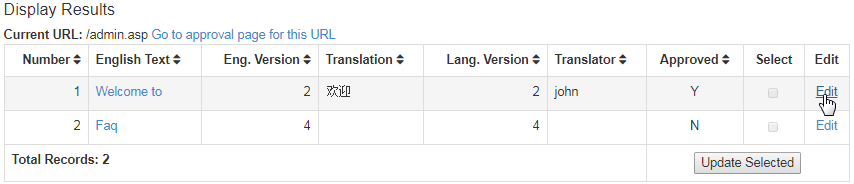
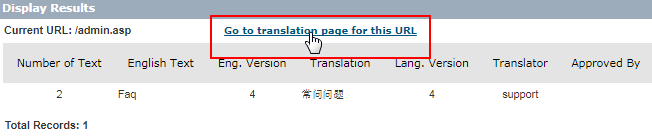
Once you click on the view details link, a new window will open up. Notice the Display Results table. It will show you the content of that page. The entire content is listed in separate line as it is designed in the WebText. In order to update the content, click on the Edit link corresponding to that line/row.
- Number: The content of the page is divide into separate lines. This shows the line number (from top to bottom of the page).
- English Text: The content in that respective line of the page in English language. This is the default content of that page.
- Eng. Version: The version of the translation, i.e. how many time the content in English language has been translated till date.
- Translation: The content corresponding to the English language for that chosen language. This is where you can edit the texts.
- Lang. Version: The version of the translation, i.e. how many time the content in that certain language has been translated till date.
- Translator: The username of the translator, i.e. the admin user who has done the translation in the chosen language.
- Approved: Y means that the translation has already been approved by senior translator or admin. N means still not approved.
This should make the Translation text area editable, where you can edit the content. Make sure that the Select check-box is ticked (enabled by default). As an admin if have the privilege to approve the translation, then the Approve check-box would appear (checked by default). You can directly approve the text by checking on the Approve box. You can also edit multiple lines simultaneously. Once done, click on the Update Selected button below.

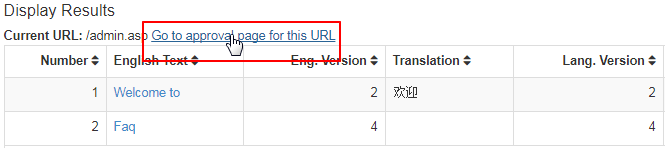
Alternatively, you can also visit the Translation Approval page by clicking on the Go to approval page for this URL at the top of the Display Result table.
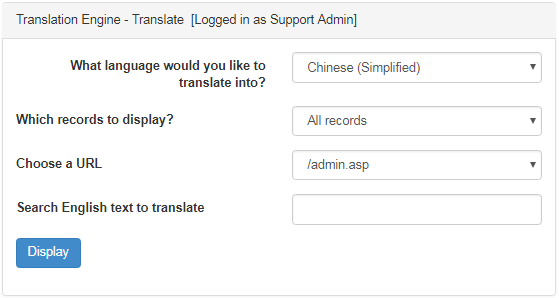
We would discus the translation approval process later in this manual. In the translation details page, above the Display Results notice the search engine. The section termed as Translation Engine - Translate contains the filters with the information auto-populated from previous step (as in the Translation main page), with an extra filed - Search English text to translate - via this filter you can search for a word/phrase in English language to translate.
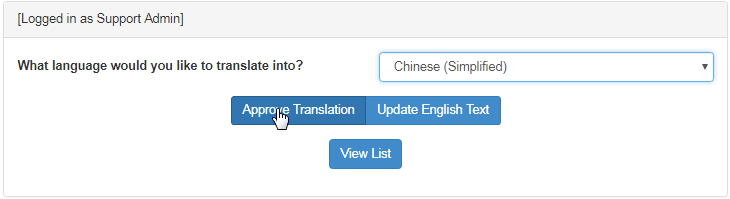
In the Translation Engine page, select the language you want to approve from the drop-down list then hit the Approve Translation button.
- Alternatively, you can select the specific language and then click on the View List button below to view the list of all the pages.
- Then click on the view details link corresponding to that page URL that you want to approve translate for (in Display Results section).
- In the next page, click on the Go to approval page for this URL link (under Display Results) to go to the Translation Approval page.
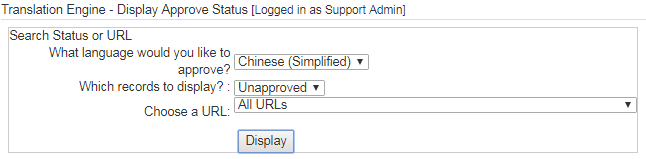
You will then be redirected to the Translation Engine - Approve page. You will notice a search engine box which you you use to specialize your search criteria as follows. Once you select the options (filters), click on the Display button below. The system would fecth the result that matches the criteria.
- What language would you like to approve? It shows the language that you gave chosen in the previous step. You can change the language.
- Which records to display? This filters the result according to the option you choose from the drop-list. Here's the description of the options;
- All records: It would return the list of all the pages, irrespective of the fact that the content requires to be approved or not.
- Approved: It would return the list of all pages that are translated and already approved by the admin or senior translator.
- Unapproved: It would return the list of all pages that are translated and pending for approval by admin. This is the default option.
- Choose a URL: If you know the URL of the page, select the one from the drop-list to view the result. This would return the content pending for approval for that page only. To know the correct URL of the page, open the respective web page and check the address bar in your web browser.
As said earlier that the system returns the pages that are pending for approval (Unapproved) by default. Hence in the Translation Engine - Approve page you will notice the pages which are required to be approved will be listed below in the Display Results table. Click on the view details link to proceed.
- URL: The URL of the page that needs to be approved. | Number of Text: The number of lines in that page that has been translated.
A new window will open containing the search engine (for further search purposes) and the Display Results table. If you find that the translation is correctly done, then simply click on the Approve / Disapprove All link under Approved column. It would initially say N (red box), i.e. not approved.
- Number of Text: The line number for which the content has been translated.
- English Text: The original text in English language (as appears in default system).
- Eng. Version: The version of translation done in English language.
- Translation: The content that has been translated and pending for approval.
- Lang. Version: the version of translation done for the current language.
- Translator: The username of the translator who has done the translation.
- Approved By: The username of the admin or senior translator who has approved the translation by latest.

On clicking the Approve / Disapprove All link, the Approve check-box should appear (checked by default). Also the Select check-box will be automatically be ticked. This indicates that you as an admin is going to approve the translations. Then click on the Update Selected button to confirm.

Unlike approving all the translations all at once as above, you can manage every lines of the translations individually by clicking on the corresponding Edit link. This would let you to approve/disapprove or select/deselect the ones you prefer. Click on Update Selected button to confirm the changes.

If the translation is not correct and that it needs to be edited, then click on the Go to translation page for this URL link in the Display Results section.
This would take you to the Translation Engine - Translate page, where you can change the text content and approve the same as follows;
- Select All records in the Which records to display? filter. Keeping the values of all the other fields same, click on the Display button.
- From the list of pages in the Display Results section, select the one to correct the translation for, by clicking on the corresponding Edit link.
- The Translation field should be now editable. Make the changes in the text-area as required. Check on the Approve box and then click on the Update Selected button below to confirm the changes. Make sure that the Select check-box is ticked on. You can edit multiple lines at once.

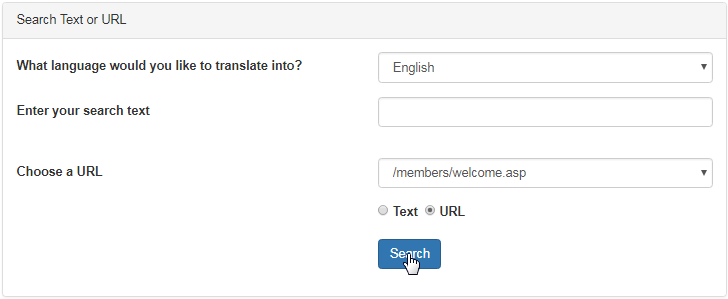
The second section of the Translation Engine interface provides you with quick search of a text or an URL for a certain language. Select the language, enter the text or choose the URL of the page, click on the appropriate radio-option (i.e. Text or URL) and then click on the Search button to proceed.
- This is very handy for finding a particular text which you have seen in a page and wish to modify, but you are unsure where to find it.
A new window will open up displaying the result that matches your search parameters. The functions are same as discussed earlier. You can search again or modify text entries from here. This is a powerful interface and can make mass changes to your system. Contact INS Support for any queries.