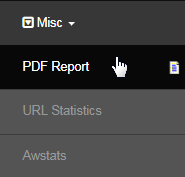
Go to Reporting > Misc > PDF Report from the left hand menu or click on the PDF Report link under Reporting on the home page.
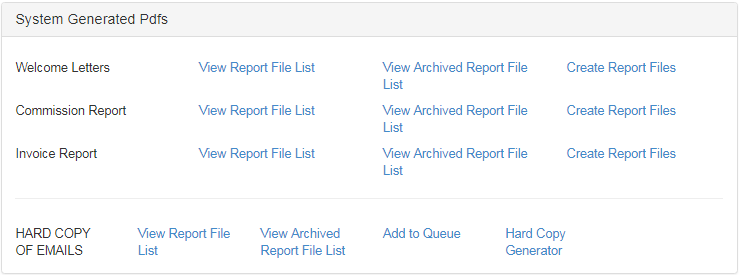
You will then be redirected to the PDF Management page, where you can generate, access and manage PDF reports for the following entities;
- Welcome Letters: The welcome letters (on signup) that were generated as PDFs to be attached to the email or sent as a hard copy.
- Commission Report | Invoice Report: The PDFs of the commission and order invoice reports that were generated by the system admin.
- HARD COPY OF EMAILS: The PDFs of the emails that were generated by the system for the purpose of printing a hard copy of the same.
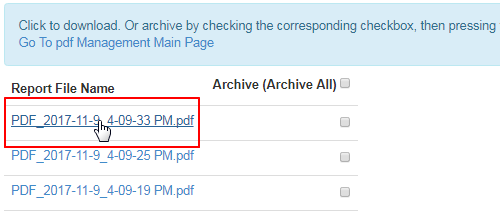
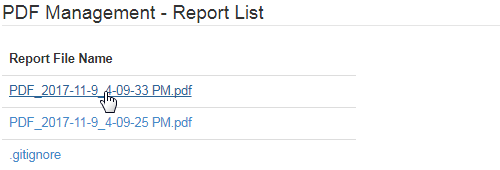
Clicking on this link will take you to the PDF Management - Report List of the respective entity. The PDF reports will be listed in descending order of the date created. You can download a PDF by clicking on the respective link. It will open in a new browser tab from where you can view or save the same.
You can also archive the reports by ticking the corresponding check-box and then by clicking the Archive Checked Items button at the end of the list.
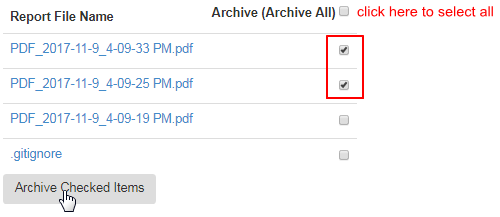
An Archiving Completed message will display to confirm the operation. The records would disappear from this list and be added to the archived list.
Clicking on this link will open up the archived list of PDF reports for the respective entity. The PDF reports will be listed in descending order of the date created. You can download a PDF file by clicking on the respective link. It will open in a new browser tab from where you can view or save the same.
This interface lets you generate PDF reports according to your preference for the respective entity. Creating report files is a three step process as follows;
- First off, you need to set the search parameters for how you want the system to fetch the data for you.
- Next, you will be shown the number of records to be created. In this step, you need to confirm the request.
- On submitting the request, the system will generate the PDF report and will provide the download link.
In step 1, the search criteria will differ based on the entity you have chosen. Here are the possible list of filters from which you can choose your option;
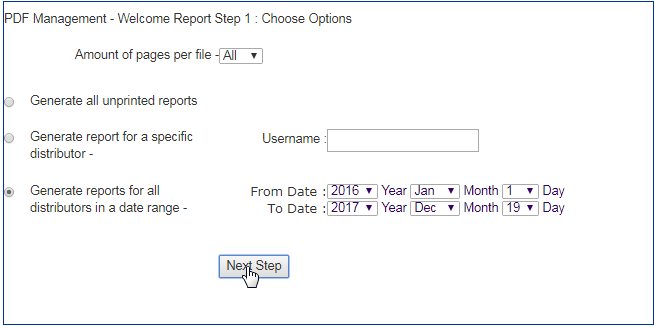
- Amount of pages per file: This is a common filter which appears in all three entities. This lets you decide how many records a PDF report should contain - whether a single record of each PDF, multiple records or every record altogether. Select your option from the drop-down list.
- Generate all unprinted reports: The system would look for the Welcome Letters which are yet to be printed and generates the PDF for the same.
- Generate report for a specific distributor: Generates the Welcome Letter for the user specified. Enter the username of the member in the box.
- Generate reports for all distributors in a date range: Generates the Welcome Letter of the members who have signed up into the system in the time period specified. Set the start and end date of the period to be used in the report. Click on the preceding radio-button to select this option.
- For this commission period: You need to select the commission period for which you want the report for. Select your option from the drop-list.
In our example, we would Create Report Files for Welcome Letters. In the first step, set the criteria and then click on the Next Step button to proceed.
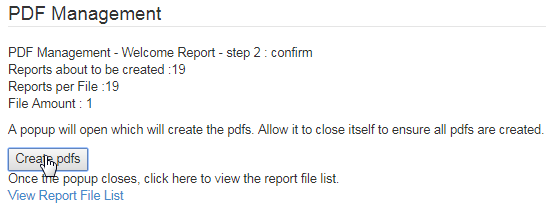
In step 2, the system will display the number of records to be generated. You need to confirm the action by clicking on the Create pdfs button below.
A popup will open in the process of generating the PDFs. Wait until the window closes to ensure that all PDFs are created. Once the popup closes, the result will be displayed on the page at the bottom, represented as links. Click on the link to download the PDF file(s) to your local computer.
Using this function module, you can create PDFs of a certain email template, which in turn you can make a print out of the same. Simply select the email, set the target users, and then click the Add button below to send the data for printing to a peripheral device (or to an intermediate store for processing).
- Please choose the email template: Select the template (available in the system) from the drop-down list that you want to create the PDFs for.
- Edit this Email: Clicking on this button would bring up the email template specified in the previous field in an editable format. This lets you manage the content of the email before generating the PDF of it. To learn more about editing an email template, visit the Email Engine manual.
- Specify group: Select the target user group whom the emails will be intended for. Select your option by clicking on the preceding radio-button.
- All members: Select this option if you want to create PDFs for all members in the system regardless of the status, i.e. Pending, Active, etc.
- Active members only: Select this option if you want to create PDFs of the email template for only the members with an Active status.
- Specify sub-group: You can further filter the results through hard copy preferences. Select your option by clicking on the preceding radio-button.
- All members regardless of hard copy preferences: Ignore the sub-group filter. Considers all the records as specified in the above filter.
- Only members who want to receive a hard copy: Consider only the members who have opted for a print out (hard copy) of the email.

The system would then search the database for members that match the criteria and display the number of records to be printed on the screen. The emails will now be added to the printing queue. Click the Generate Hard Copies link at the top right corner to go to the Hard Copy Generator interface.

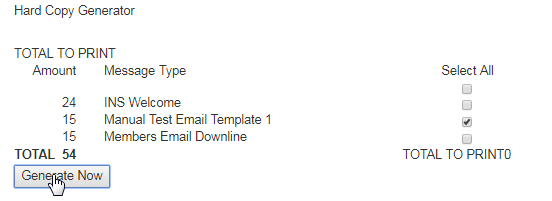
This is where you can generate the PDFs of the email template(s) that were already queued up for printing. The emails for which the PDF copies are to be created will be displayed in the TOTAL TO PRINT list. Tick on the checkbox for the corresponding email and then click on the Generate Now button.
- Amount: The number of copies of the email template specified that will be generated. | Message Type: The subject of the email (template name).
- TOTAL: The sum of all the numbers in the Amount column. | TOTAL TO PRINT: The number of copies selected for creating PDFs.
It may take some time to process the PDFs. The records that are processed will disappear from the queue. The download link to the PDF file will be displayed on the screen. Clicking on the link will open the PDF in a new browser tab, where you can print or save it to your computer for later use.
