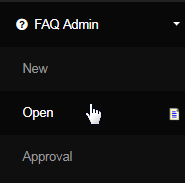
Go to FAQ Admin > Open from the left hand menu or click on Open under FAQ Admin on the home page.
This is the list of all tickets that are not New, and that have not been closed yet, i.e. the tickets which are yet to be solved or the ones with Open status (as set by the CSR while answering the same). The interface is same as that of FAQ Admin > New. Below is a description of the attributes of the table;
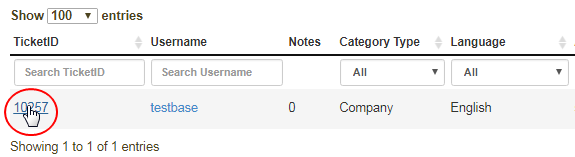
- TicketID: This is a unique identification number (or the primary key) of the ticket, by which it is identified. Click on it to open the same.
- Username: The username of the member who raised or submitted the ticket. Clicking on this would take you to the DistMaint of the user.
- Notes: A short description or comment added by the CSR for a reference. In this case, New tickets will not contain any notes.
- Category Type: The category under which the issue can be classified (as selected by the user). Click here to learn more about the Category Maint.
- Language: The language in which the ticket is submitted. You may have multiple languages enabled for your business and separate CSRs for that.
- Assignee: This field would say New, which means that the ticket is still not assigned to anyone and is yet to be answered.
- Status: This field would say New, which means that the ticket is still not assigned to anyone and is yet to be answered.
- Updated: It displays the date and time when the ticket was edited or updated by latest. In this case, it shows the date and time of submission.
- Question: The complete question that has been asked by the member in that ticket. In other words, a preview of the question asked.

The Sorting and Searching features and the quick functions are similar to that of FAQ Admin > New page. Here's a brief explanation for your reference.
- You can sort the order of display of the tickets based on your chosen attribute. Click on the column name by which you want to arrange the list.
- If the list is long, then you can search your criteria through various filters. Notice the search engines and filters just below the header column.
- You can adjust the table size by selecting the number of entries to be displayed. Use the navigation buttons at the bottom to move between pages.
- Select: You need to tick on the check-box corresponding to the ticket that you want to take action on, before clicking on the respective button.
- Delete Selected: Clicking on this button will remove the selected tickets from the New list (although it would still appear in FAQ Admin > All).
- Assign to: Clicking on this button will bring up the Assign Ticket box, where you can select to whom you want to assign the selected tickets.
The purpose of the Open tickets is that when the CSRs require help or more information to gather to be able to solve or answer the issue/question. You should find the note/comment in from of new question (answer to the previous question). To start with, click on the TicketID link to open the ticket in full view.
The Details section contains the information of the ticket and the member who has submitted the same. The interface is same as that of FAQ Admin > New answering page, i.e. the system brings up the same FAQ - Editing page with additional comment. Here's a brief description of the fields in this area.
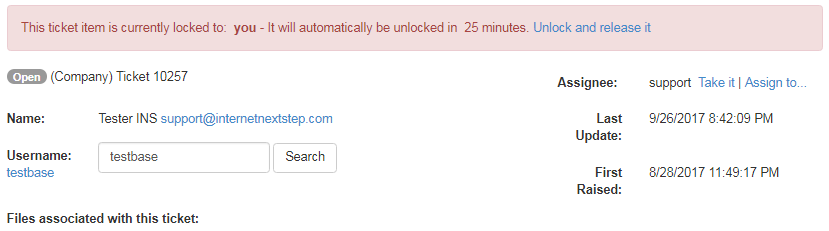
- At the top, notice the message displayed, where it says that the ticket is locked to the [[username]] for 25 minutes (in this case, yourself).
- The Status of the ticket, which in this case is Open, the Category under which the ticket has been classified and the unique TicketID.
- The full Name of the member who has raised the ticket, along with his email address (which takes you to the email manager when clicked).
- The Username (as a link, which redirects to the DistMaint) of the member who has raised the ticket. Also a search field to look for other Members.
- The Assignee of the ticket (in this case, it's New). Also contains two other links, which you can find handy to edit the assignment as follows:
- Take it: Clicking on this link would invoke the system to ask, Assign Ticket to yourself?. In this case, it is already assigned to you.
- Assign to: Clicking on this link would bring up the Assign Ticket box, where you can select to whom you want to assign the ticket.
- Last Update | First Raised: The time and date by which the ticket was updated by latest | the ticket was submitted by the member.
- Files associated with this ticket: If the member has attached any files as a reference to his query, then that would appear here in a list.
Now in the Ticket section, you will notice the questions or comments listed (latest one first). The answer to the previous question becomes latest the question. Rest of the functions and fields remain same as depicted in the FAQ Admin > New editing interface. Find the brief description of the fields below.
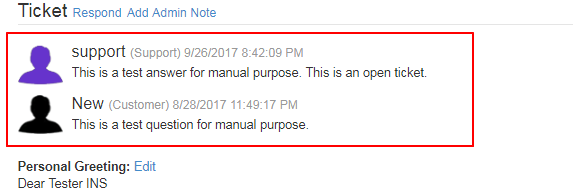
- Respond: Clicking on this link will jump the cursor to the Response text-box, where you can start answering the question straight away.
- Add Admin Note: Clicking on this link will bring up the Admin Only Note box, where you can add a message for the selected support staff.
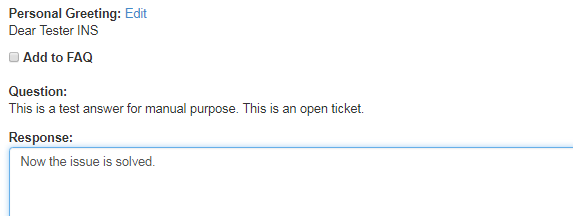
- Personal Greeting: The greetings message/content for the feedback. Click on the Edit link to change the content as preferred (autosave).
- Add to FAQ: Tick on this check-box, if you think that this question/answer is fit to appear in the FAQ list (made public to all members).
- Question: The latest question or comment that needs to be looked at. This would appear in a text-box, if the Add to FAQ box is checked.
- Response: This is where you type in the answer to the query. Expand the box from the bottom right corner to the required size to get a full view.
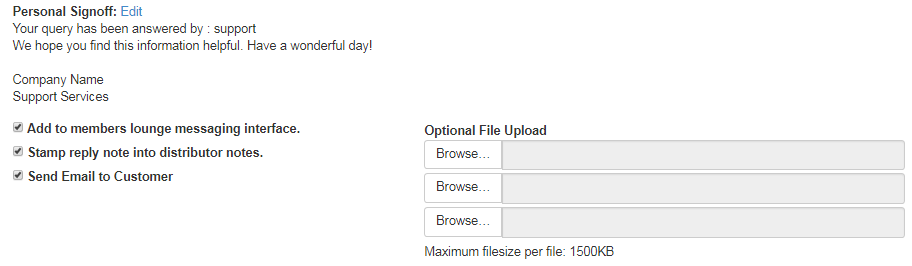
- Personal Signoff: The sign-off message appended to the response. Click on the Edit link to change the content as preferred (autosave).
- Add to members lounge messaging interface: Check the box if you want to send the response as a message to the Members Lounge.
- Stamp reply note into distributor notes: Check the box if you want to stamp the question/answer as a note in the DistMaint of the member.
- Send Email to Customer: Check the box if you want to email the response to the member through their registered email address.
- Optional File Upload: You can attach any document, like screenshots (images) to support your answer. Click on the Browse button to select and open the file from your local computer. You will notice that the file name gets populated in the box next to it. Be aware of the size per file limit.
Before submitting the response, you can change the Category, Language and Status of the ticket by selecting the option as follows:
- If you want to add this ticket to the FAQ and make sure it goes under a different category/language, then select the correct option from the drop-list.
- You can view the status of the ticket based on your requirements. By default, the value is Closed Resolved. Here's a description of the options;
- New: The ticket will be posted in the FAQ Admin > New listing. It will treated as a New ticket (along with the response).
- Open: The ticket will be posted in the FAQ Admin > Open listing. It will treated as a New ticket which has not been closed yet.
- Pending Customer: This means that you are waiting for feedback or more information from the member for further investigation.
- Pending Support: This means that you are holding the ticket for deeper investigation by support and that you need more time.
- Closed Unresolved: This means that the ticket is not required to be solved (or has been solved) and that you are closing the issue.
- Closed Resolved: This means that the ticket has been answered or the issue has been resolved and that you are closing it. Default status.
- Archived: The ticket will be transferred to a less frequently used folder (archived), which you may require to act as a reference in the future.
- Once you are satisfied with the edits/data and have chosen your preferences, click on the Submit to Customer button to commit to the changes.

After submitting the response, you will be redirected to the Admin Faq Email Send page. If everything goes well, you will see the message, Mail sent along with a summary of the response. The page provides two quick links for your easy navigation: Back to FAQ Admin and Back to Ticket Detail.