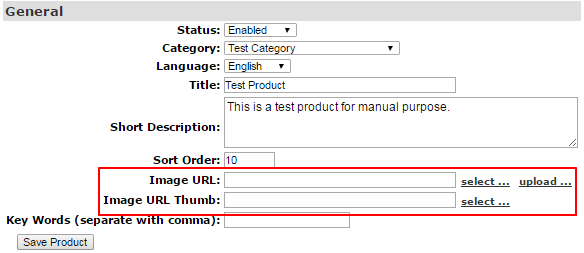
In the General section on the Product Edit page, you will notice the options to add images of your product to be displayed in the Shopping Cart. You need to upload the image file in the File Manger of the system to make it available for linking purposes. Let us have a look at how this can be achieved.
From your admin login, go to the Configuration > Shopping Cart > Product Maint page. Locate the product for which you want to add the images to and then click on the [Edit] link next to the product name to go to the editing section. In the General section, the two options we need to focus on are:
- Image URL: This is where you select a picture that corresponds to your product, to be displayed with the full view of the product in the cart.
- Image URL Thumb: An image thumb is a small image of the product displayed alongside the Short Description in the category view.
If the image is already available in the system, you can select it from the File Manager or paste the path name of the image file (location of the file in the system folder) in the text-box provided. In this example, we will upload a new file into the system to make it available for linking.
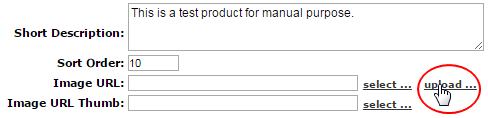
Step 1: In order to upload a new image file into the system, click on the upload link corresponding to to the Image URL field in the General section.
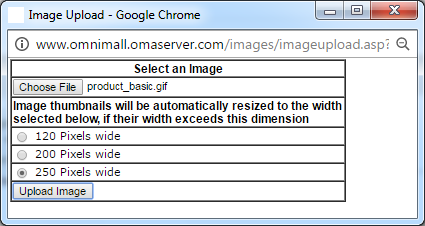
Step 2: A new window should pop-up, with the options to Select an Image. Click on Choose File to browse and open the file from your computer.
Step 3: Notice that the file name appears next to the button. Select an image size for displaying the thumbnail picture for when people view the product.
- There are three options for thumbnail size: 120, 200 and 250 pixels square. Click on the radio-option to select the one you prefer. The system will automatically generate a thumbnail from any image you upload with the dimensions you choose. Once done, click Upload Image.
Step 4: If all has gone well, you should see the File Uploaded Successfully dialogue. Click OK to acknowledge the same. The Image URL details should now be in the General section of the Product Edit page. Click on theSave Product button below in this section to commit to the changes.
- Note: If you see a Nothing has been uploaded error dialogue, then no image file was selected. Click on the Try Again button to retry.
Go back to Product Maintenance and click on the category name under which the product (recently added image) has been placed. You should see a thumbnail displayed beside the product under the category. This thumbnail is automatically generated and uniform in size across the category.
Note: All product images will display as 150 pixels square if hard encoded image sizes are in effect. Contact INS Support if you think this is the case.