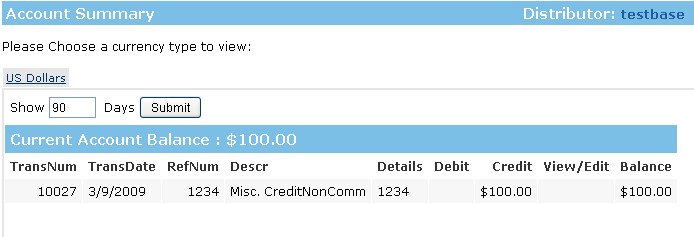
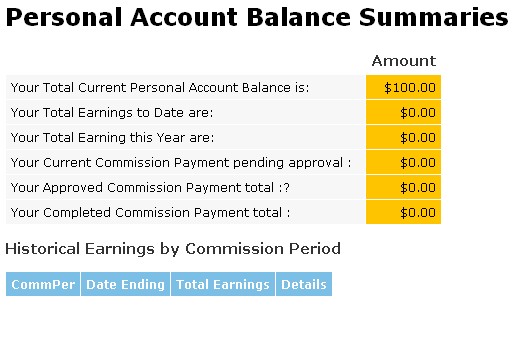
i. Account –
Personal Account in the system each member is given.
This is where the commissions will get put before you push the button to generate withdrawals.
Allows you have the Account Upd function to add or subtract money from a members account.
ii. Account Upd –
allows you to add and subtract money from the members account.

- Trans Type – The type of transaction you are going to do.
- Misc Debit – To take money out of the members personal account
- Misc Credit – To put money into the members personal account.
- TransDate – The date you want to show up as the date the transaction was done on.
- RefNum – You can use this for whatever you would like, maybe a check number or a paypal transaction number to trace where a deposit to the personal account came from.
- Descr – a description of what the transaction is for that will show up in the members personal account section.
- Currency – which currency are you adding or subtracting from. Multiple currencies are available in our system.
- Amount – How much are you adding or subtracting from the personal account.
iii. Order Entry –
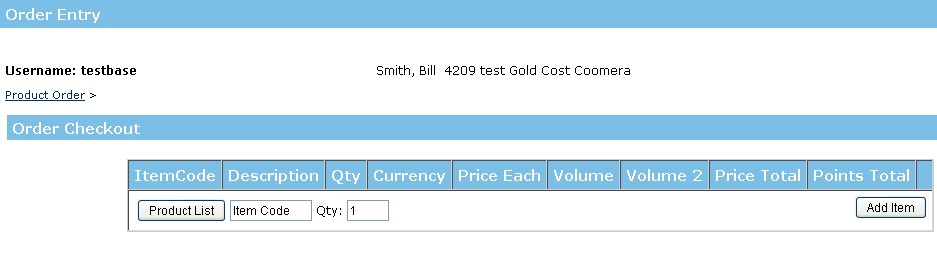
Works exactly the same as Admin-Order Entry section above, it just doesn’t need the username as it knows it due to you being in the member record. Just another place to access this function.
iv. Payment Types –

This is where the member can set up payment types. If you don’t see any payment types listed, you have not correctly configured your payment types as per earlier in this manual. Contents here will change based on how you have configured payment ty area.
- Order Payment Type – Can add additional credit cards if you have configured credit card as a member payment type in payment type setup area.
- Commission Payout Types – whatever you have configured for outgoing types will show up here for the member to.
v. Transfer History –

Shows a list of all Inter Member Transfers done by the member.
vi. Autoship –
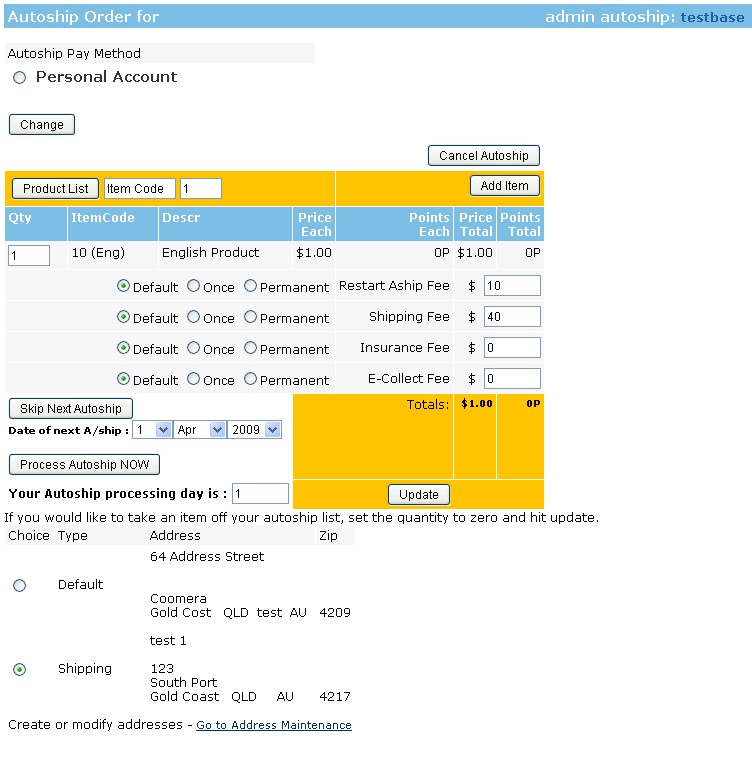
The area that Admin can change and modify the members autoship.
- Autoship Pay Method – the payment methods that you have asked to have available for autoships will show here.
- Product Selection area – straight forward area to enter or change what products they have on autoship.
- Fees Area – all fees can be set to be either as per default settings, this fee to be 1 time only, then revert to the default fees, or this person to have a permanent different fee than the system defaults would otherwise use. You do this by selecting the appropriate radio button beside the fee you are modifying.
- Shipping – you can override any shipping formulas in the system here.
- Insurance – you can add a shipping insurance fee here.
- COD – you can add a COD service charge here.
- Autoship Restart – you can set a penalty charge for going off autoship here and charge them for going back on autoship. This could also be used for any other miscellaneous fee you would like.
- Date of Next Autoship – displays the date of this members next autoship shipment.
- Skip Next Autoship button – allows you to skip 1 periods autoship. It will automatically set the date 1 month forward and the autoship will be picked up again in the system for the following period.
- Process Autoship Now button – Allows you to process an immediate autoship for someone. Often after someone asks you to skip, if they find a good member to join, they will want to get an autoship in immediately so they do not lose out on commissions.
- Your Next Autoship processing day is: - this is what day of the month the members autoship will be processed. It can be changed forward, but the system will not allow it to be changed backwards or it would essentially skip them a month which would be an unexpected result.
- Preferred delivery date and time (turned off by default in North American Systems, can be enabled in SystemPrefs)
- In some countries you can ask for time specific shipping. Not relevant to North American Customers, but a great feature for Taiwan, or Japan or many Asian countries.
- System stores this information so it can be exported appropriately in a csv to send to an outsourcer, or printed onto your shipping company’s paperwork to make sure it goes out appropriately.
- Autoship Shipping Address – you can add or change autoship shipping addresses in this section. To change a shipping address, do not edit the one. Add a new one, then switch positions with the address in the system you do not want to use at this moment. This will ensure if they switch back, you do not have to rekey all the information. The system can handle unlimited shipping addresses and other addresses.
- Autoship Notes – you can keep notes relative to autoship in this section. All notes you put into this section also show up in the main notes section (also an Advanced System Only function) marked as an autoship note. This facilitates the admin area to keep all information in a central location for ease of customer service.
vii. Emails –
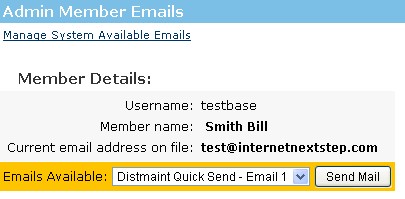
This is where you can trigger emails that you have set up in the Configuration / Email Options / Distmaint Emails including macro use to be sent to this member.
viii. Invoices –

This is a list of all members invoices from their first invoice forward.
- Refund – If you click the refund button, you will get the refund options page to come up and can refund any order in the system.
- a. You can search for another order number from this page.
- b. You have 4 options of refunds: i. refund points and money 100%. ii. refund points but no money. iii. refund money but no points. iv. refund points 100% but money 90%.
- c. When you are ready to refund, hit the “Next†button.
- d. Select a reason for refund which is just for your reference.
- e. Select the method you want to refund by: i. if you select check, it will put the refund request into your next check writing report. ii. if you select wire transfer, it will add it to the batch of wire transfers that you are planning to send out. iii. Credit card will refund the order to the credit card on file if you are hooked up to online processing.
- f. Select the option you want to use with the radio button and press the “Submit†button.
- g. You will see a confirmation of the refund in the blue header strip at the top of the page.
ix. Earnings –
Report on member's earnings.
x. Summary –
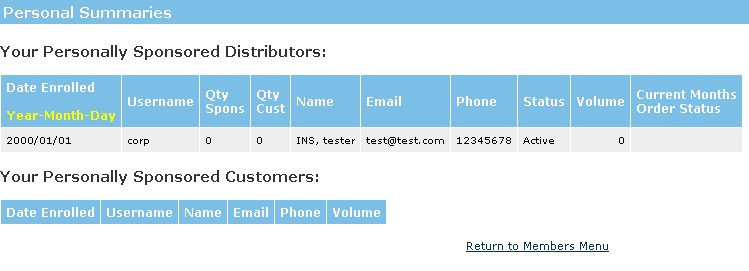
A report that shows this member personally sponsored Distributors and Personally Sponsored Customers. This report is updated 1 time per day.
- Date Enrolled – the date this member was enrolled.
- Username – the username
- Qty Spons – how many members this member has personally enrolled
- Qty Cust – how many customers this member has personally enrolled
- Name – Name of the person personally enrolled.
- Email – email of this members personally enrolled members.
- Phone – Phone number
- Status – Financial status of this personally enrolled member.
- Volume – how many points of volume this personally enrolled member has purchased so far this month. (real time)
- Current Months Order Status –
xi. Volume Adjust –

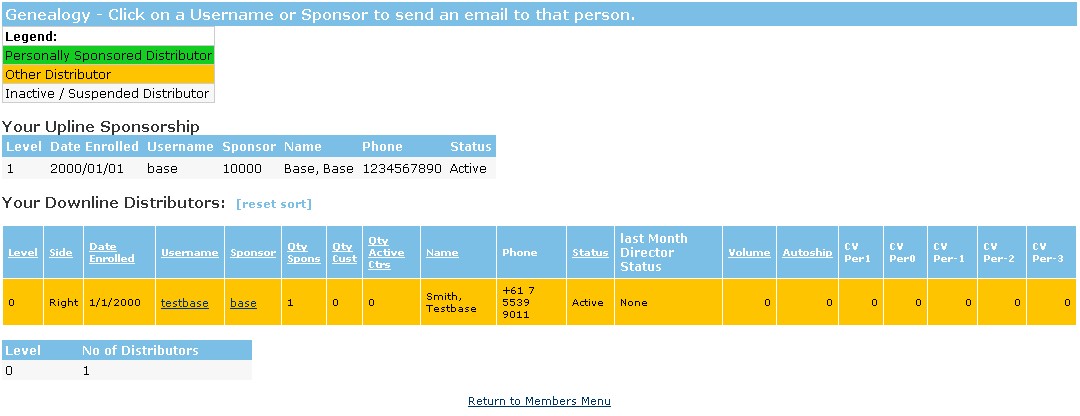
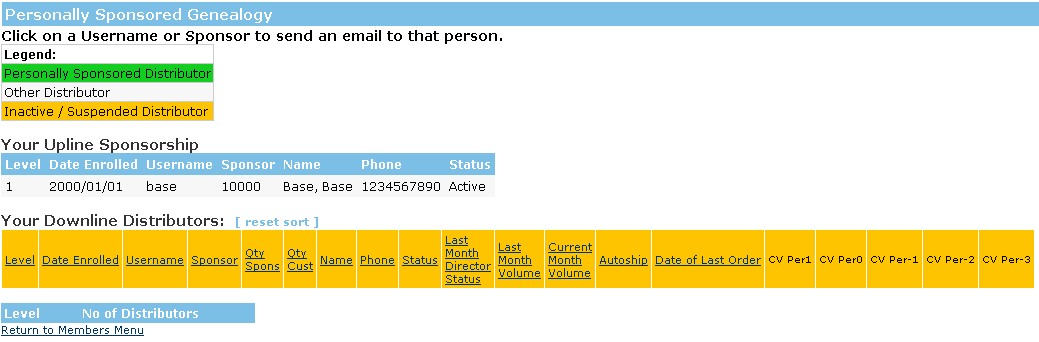
xii. Genealogy & Genealogy PS –
xiii. Viewer –
This is a graphical viewer that is real time and contains a lot of information
Text Color Signifies different things
- Green – Active
- Blue – active
- Red – suspended member
- Grey – terminated member
- Yellow – unfinancial member
- Black – not enrolled by you so no information available
- Background color being pink - this member is not on autoship.
Button  – Information button will spawn a popup with more details on your personally sponsored members. You can have this set to show for all members or personally sponsored members only, let us know which you would like.
- Name – Name of Member
- Phone – Phone number of member
- Autoship – how much this person is on autoship for
- Points this period – how many points this person has purchased so far this period.
- Qty Sponsored – how many members this member has personally sponsored so far.
- Date last sponsor – what date did this member last sponsor a member.
Button  – Email button that allows you to email this member directly. It allows this without ever giving up the members email address so always your company data is safe.
Button  – Placement setting engine comes up if you push this button so you can set your next personally sponsored member to go under this person.
Jump to Handle – allows you to enter any other handle and have the downline viewer jump to that handle. In the admin version this will allow you to jump upline and downline and sideline, but in the members lounge version it will constrain you to your own downline.
Arrows pointing left at the top of the tree allow you to navigate above this member. In the admin version it will even allow you to navigate above the member at whom you entered the tree, the members lounge will only allow you to go back up to the member you started at.
Arrows at the bottom of a line pointing right allow you to navigate further down the line of the member the arrow is to the right of.
xiv. Flag Type –
This allows you to qualify members at levels they do not deserve. While we do not agree this is a good idea to do, we do recognize sometimes it is necessary so we have this function included in our system.(Advanced system only)
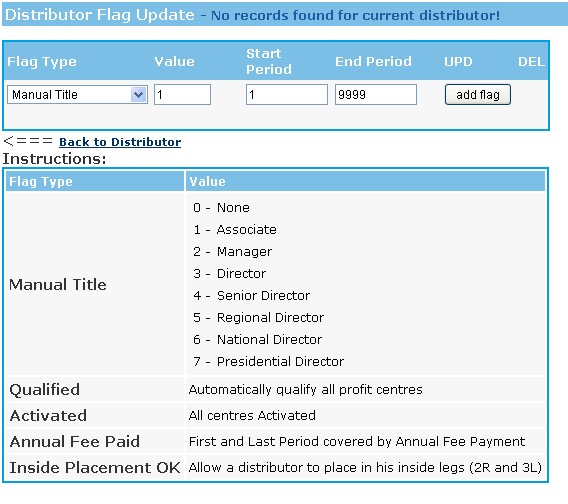
This will be based on your system settings and what you have had us program for you in this area. It could be a qualification or rank flag, it could be a flag that allows them to get paid even if they are not on autoship, it could be a flag that overrides a group volume setting, the possibilities are pretty much limitless.
- Value – this is where you enter the value of the flag you want to use which will correspond to the legend at the bottom of the page.
- Start Period – What period do you want this flag to start. If in doubt enter 1.
- End Period – what period do you want to stop this flag from being used. Enter 9999 for permanent.
- Update – click this button to update an existing flag.
- Del – click this button to delete a flag
- Add Flag – click this button to add a new flag.
Click here for a Tutorial on how to connect a flag to a Distributor
xv. Messages –

This is a listing of all messages the member has had posted to their members lounge and when they read them. Distributor Maint > Members > Messages.
xvi. Members –
This link will take you into the members lounge. It will not force you to read any outstanding messages before you can investigate something, it is a direct pipeline into the members lounge for those occasions where you need to access it. When you enter the members lounge using this link, you will have a link back to admin show in the members lounge. Of course if you enter the members lounge by putting in the password and username, you will be hit with all the security questions, and must read any outstanding notes, and will not have a link to admin.
xvii. Admin –
This just takes you back to the main Admin home page.