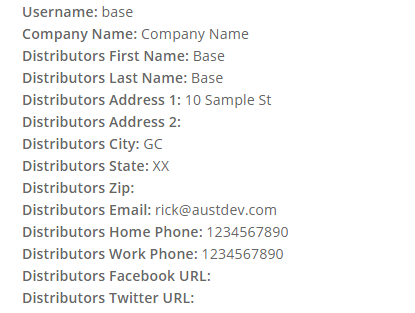
A macro is a rule or pattern that specifies how a certain input sequence should be mapped to a replacement output sequence (also often a sequence of characters) according to a defined procedure. You can use macros within our system to display specific information about users (for convenience).
To display macros, you simply wrap the keyword for the right macro you plan to insert within the square brackets. To view macros in action visit the home page of your website before you begin editing, and you will find a list of all available system Macros displayed. Click here for full list of Macros.
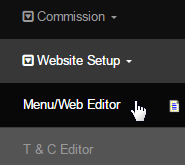
However to be able to see the actual macro code, you have to visit the Menu/Web Editor page in your admin control panel. Here' are the steps:
Go to Configuration > Website Setup > Menu/Web Editor. from the left hand menu or click on the same under Configuration on home page.
Once you have arrived at the website section editor, you have the ability to edit any pre-existing webpage on your website. You also have the ability to add new webpages entirely. Locate the page you want to edit by expanding the section under which it resudes and then click on the Edit link next to it.

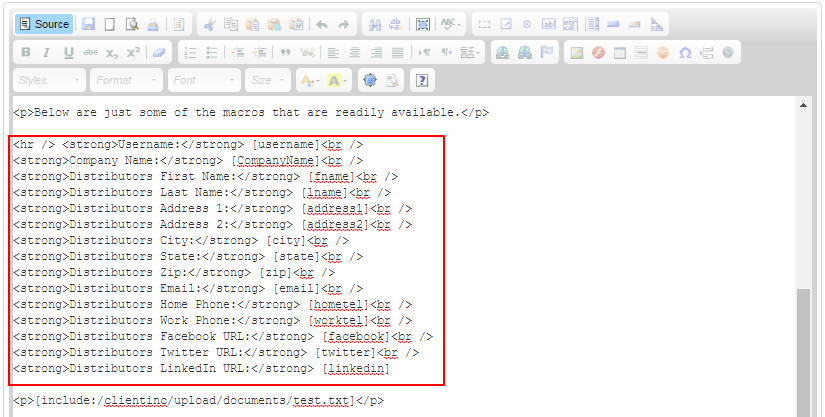
You will then be displayed with the Desktop or WYSIWYG version of the page, where you can add/edit your desired macros. From the html view you can see the actual macros code, compared to that of the page itself where it displays the actual information that the macros are suppose to display.
After you have completed designing the page, you may like to Preview the changes or click on the Save button to commit to the changes.
You also have the ability to allow certain user groups to see certain macros. This is an advance process and Not Recommended for Beginners.
For example, using this macro the following macro code will only display to prospects, who have either not signed up to the site or it is their first visit.
[display.start:0] display macro 0[display.end]
Using the two macros below will display information to other user groups. These macros can all be placed on the same page in the same area. This Feature is very useful if you only want to display certain content to prospects who are visiting the website, and then after signing up they have full access to all the features on the website. Although it may look crowded in the web-editor but on the on the webpage it will look fine.
[display.start:1] display macro 1[display.end]
[display.start:2] display macro 2[display.end]
You also have the capability to upload certain files, which can only be seen by certain user groups. For this function to work correctly you need to make sure you have the correct file path.It is best to copy the file path directly from the file upload manager to reduce the risk of receiving an error.
[include:/clientinc/upload/documents/test.txt]
These files can be found in the the Website Setup > File Upload section. You can also upload the files that you want to be displayed within the macro to the file upload area. This function is useful because the company name file manager has the ability where you can upload multiple files at once.
If you wish to edit in the HTML viewer, then first create a backup of the content. Simply copy and paste the original content in a notepad and save it in your computer. You may also like to edit the content in the notepad and then copy-paste the latest content back to the editor to reduce a risk of error.